I remember the days when I wanted to build my home lab and run virtualization on it. It was a challenge to find something budget-friendly and home-lab compatible that supported it.
Later, even if you had the right hardware, running nested virtualization was still a challenge.
Intel was the first to support virtualization, and AMD followed later.
So, while writing this blog article and updating it to the 2025 version, I got a bit nostalgic and remembered the old days.
In this article, I will explain the prerequisites for using nested virtualization on your Hyper-V machine, and how to enable it in under one minute.
What is nested virtualization?
Nested virtualization allows you to run a virtual machine inside another virtual machine. In other words, it enables a VM to act as a host for additional VMs.
This is useful for lab environments, testing, training, and scenarios where you need multi-layer virtualization without relying on physical hardware.
I use it for testing and writing blog articles, including this one.
Prerequisites
To run nested virtualization, also called multi-layer virtualization, there are a few prerequisites your Hyper-V server must support:
- CPU: Intel VT-X with EPT or AMD-V with NPT.
- OS: Windows 10/11, Windows Server 2016/2019/2022/2025
- VM configuration version: At least 8.0 for Intel or 9.3 for AMD. If you are running one of the OS versions listed above, you are already fine.
- RAM: 8 GB, but 16 GB is recommended
- BIOS/UEFI: Virtualization must be enabled
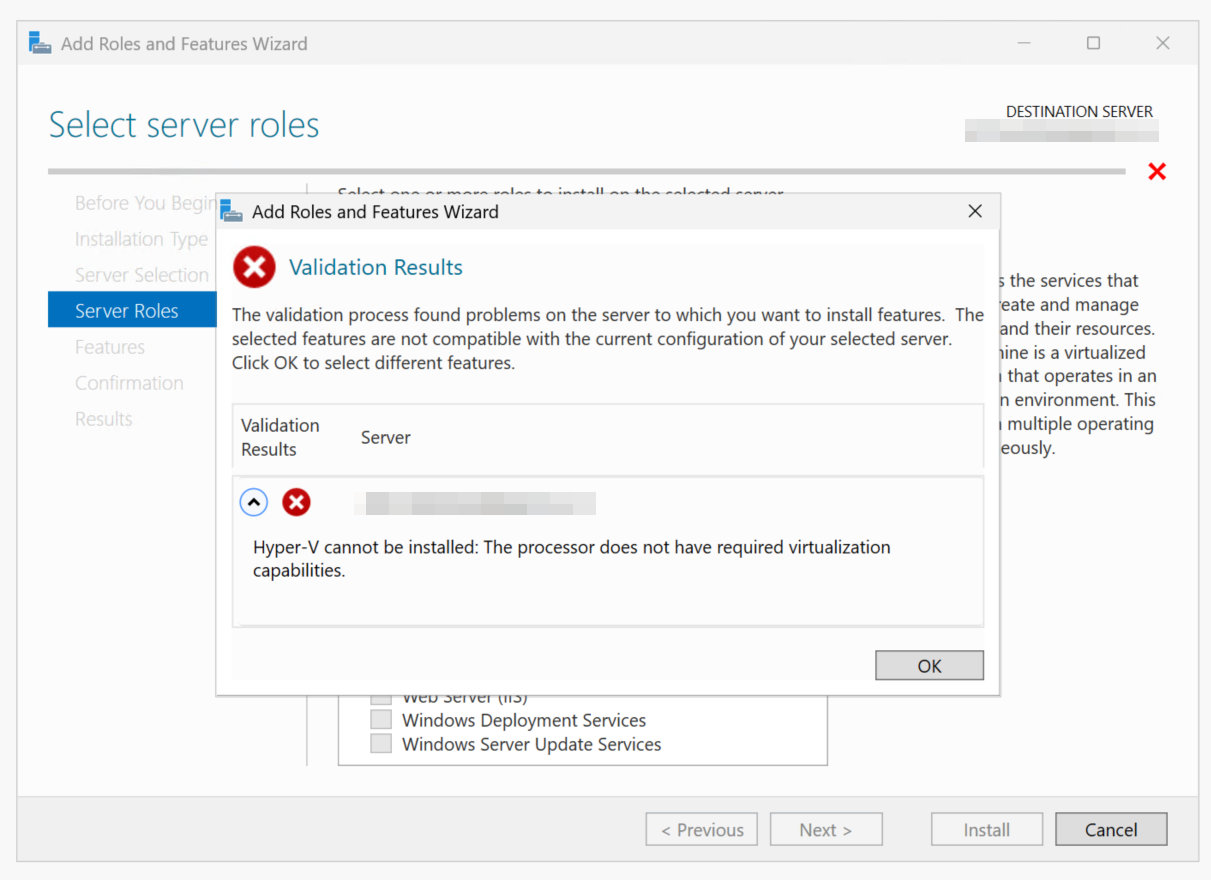
If nested virtualization is not enabled, you will see an error like the one shown in the screenshot below:
How to enable it?
Sometimes, behind big obstacles, there are simple steps to fix them, including this one. It only takes one PowerShell command to prepare your VM for nested virtualization.
Navigate to your Hyper-V machine or server where your VM is hosted, shut down the VM, and follow the steps below:
- Click on Start and search for PowerShell.
- Right-click Windows PowerShell and select Run as Administrator.
- Enter the following command and press Enter.
Set-VMProcessor win-srv-2019 -ExposeVirtualizationExtensions $true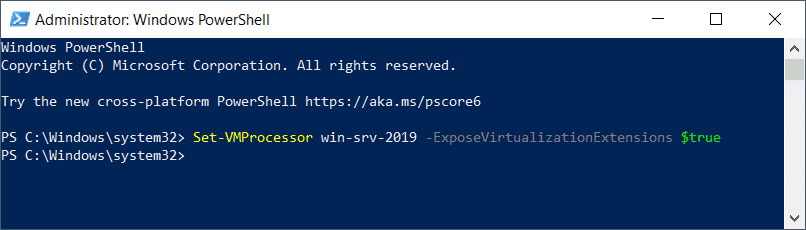
| Parameter | Description |
|---|---|
| Set-VMProcessor | Configure the processor settings of a Hyper-V VM. |
| win-srv-2019 | The name of the VM where nested virtualization will be enabled. |
| -ExposeVirtualizationExtensions | Exposes hardware virtualization extensions to the guest VM. |
| $true | Boolean value that enables the ExposeVirtualizationExtensions feature. |
- Open Hyper-V Manager.
- Turn on the guest VM.
- Install Hyper-V Server or any other type 1 or type 2 hypervisor.
If you’re just starting out:
Comment below with “STARTED” and tell me what you’re building. I’ll personally
respond with tips specific to your use case.
If you’re an experienced admin:
What’s your best nested virtualization tip? Share it in the comments to help
others in the community.
If you’re stuck:
Don’t waste hours troubleshooting alone. Drop your error message or issue below
and let’s solve it together.
Portal Edukacja
March 25, 2021 at 12:04
Your writing style has been surprised me. Thanks, quite nice post.
Jasmin Kahriman
March 25, 2021 at 14:08
Thank you.