With PowerShell, you can create a fully configured Hyper-V virtual machine in under 2 minutes; no clicking through wizards, no manual configuration.
This tutorial shows you the exact PowerShell commands to automate VM creation on Windows Server 2016/2019/2025 and Hyper-V Server core.
Why PowerShell?
When creating VMs in Hyper-V, we can use the graphical interface through Hyper-V Manager or PowerShell. PowerShell commands can be executed directly on the Hyper-V instance or remotely from any machine that has access to the Hyper-V server.
PowerShell also helps us with bulk creation and configuration, as well as automation and scripting. In one of my blog articles, I also use PowerShell to monitor created checkpoints. Read it here.
Prerequisites
In order to create VMs on your Hyper-V server using PowerShell, there are a couple of prerequisites, including:
- Running Hyper-V Server
- ISO file of the OS you want to install
- Enough resources to create additional VM(s)
- An account with administrative permissions
I am going to create a virtual machine configured with Windows Server 2019, 16 GB of RAM, and 200 GB of disk space.
In this guide, we’ll manually create a VM using an ISO file. However, in production environments, this entire process is often automated through scripts for bulk VM deployment.
Step by Step
This step-by-step guide is executed directly on your Hyper-V server:
- Click on the Start Menu and search for PowerShell.
- Right-click on Windows PowerShell and select Run as administrator.
- If asked, click Yes to confirm running PowerShell as administrator.
- Type the command and press Enter.
New-VM -Name PRTGCoreServer -MemoryStartupBytes 16GB -BootDevice VHD -NewVHDPath
D:\Hyper-V\prtgcore01.vhdx -Path D:\Hyper-V-NewVHDSizeBytes 100GB -Generation 2 -Switch LAN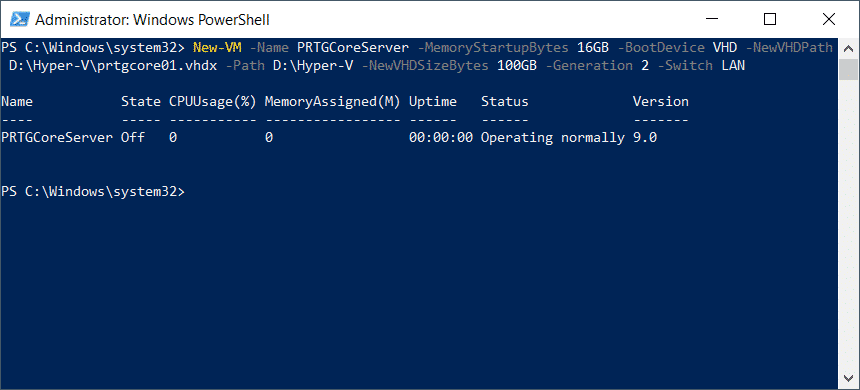
| Parameter | Description |
|---|---|
| New-VM | Creates a new virtual machine in Hyper-V. |
| -Name | The display name of the virtual machine (e.g., “PRTGCoreServer”). This name appears in Hyper-V Manager. |
| -MemoryStartupBytes | The amount of RAM assigned to the VM at startup, specified in bytes (e.g., 16GB) |
| -BootDevice VHD | Specifies that the VM should boot from a virtual hard disk. |
| -NewVHDPath | The file path and name where the virtual disk will be created (e.g., D:\Hyper-V\prtgcore01.vhdx). |
| -Path | The directory where VM configuration files are stored (e.g., D:\Hyper-V). |
| -NewVHDSizeBytes | The maximum size of the virtual hard disk in bytes (e.g., 200GB) |
| -Generation | The VM generation: Gen 1 (legacy BIOS) or Gen 2 (UEFI, recommended for Windows Server 2012 R2+). |
| -Switch | The name of the virtual switch to connect the VM to the network (e.g., “External Switch”). |
- Mount the ISO file to the VM. We’ll use the Windows Server 2019 ISO downloaded from Microsoft.
Add-VMDvdDrive -VMName PRTGCoreServer -Path D:\ISO\WinSrv2019.iso
| Parameter | Description |
|---|---|
| Add-VMDvdDrive | Adds a DVD drive to a virtual machine. |
| -VMName | VM display name (e.g., “PRTGCoreServer”) |
| -Path | The ISO file path (e.g., D:\ISO\WinSrv2019.iso) |
- Start the virtual machine.
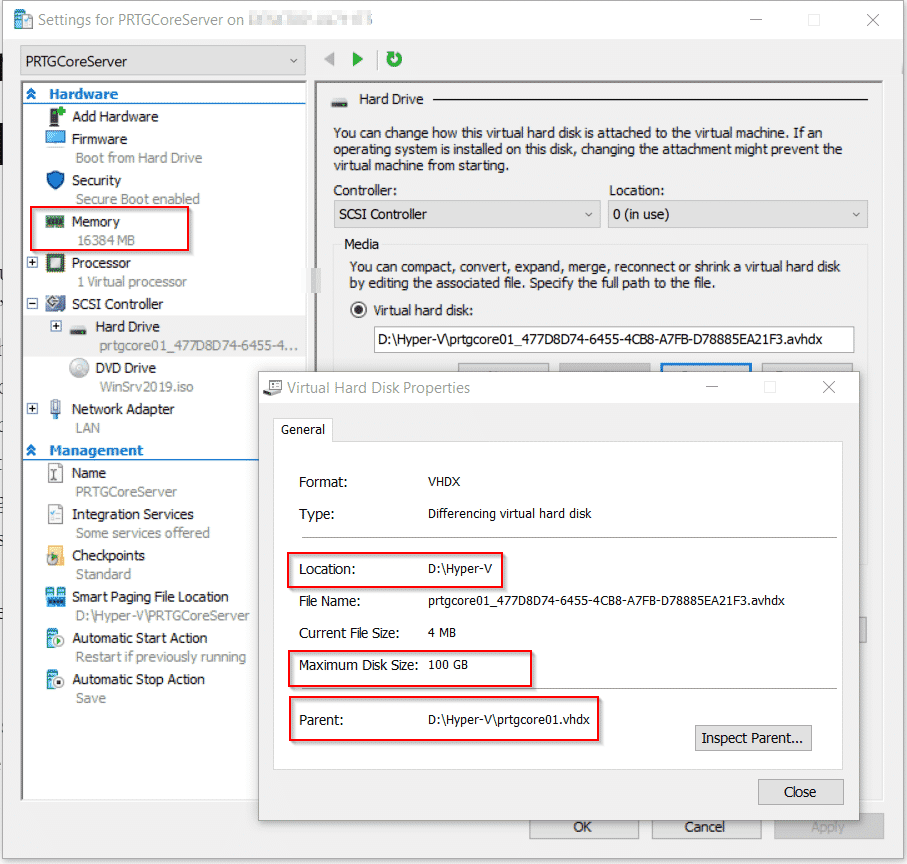
Start-VM -Name PRTGCoreServerYou have successfully created a new virtual machine using PowerShell. If you navigate to Hyper-V and check the VM settings, you will see the exact same configuration as specified in PowerShell.
Access the VM via Hyper-V Manager and go through the installation and configuration. As mentioned, this process can also be automated, but that is not covered in this blog article.
Question for you: Are you managing Hyper-V VMs manually or using automation? Share your setup in the comments below; I’d love to hear how you’re using PowerShell in your environment!