Windows is one of the most popular operating systems. According to Statista, Windows holds 65% of the market share with its client and server operating systems. It is used across various sectors, including government, healthcare, education, and the private sector.
Our work on Windows and Windows servers revolves around the data. Hence, we need to take our data the right way.
Microsoft offers native backup solutions for Windows and Windows Server; however, it is limited with almost no innovation in the last couple of years. No innovation leads to limitations within the product and decreases customer satisfaction.
That is where BDRSuite, a powerful backup solution developed by Vembu Technologies comes into place. BDRSuite is more than a Windows backup. But, today, we talk about Windows only.

I explained the differences between Windows Server Backup and BDRSuite in this article BDRSuite could be an Effective Alternative to Native Windows Server Backup.
BDRSuite has all advanced backup features and helps you to backup up to 10 Windows or Windows Server machines at no costs.
In this article, I want to show you how to configure and execute Windows backup with BDRSuite, including disk image and files and folder backup.
Step-by-step configuration
We start from the point where you already installed BDRSuite on your Windows Server. If you haven’t, please refer to this article How to install BDRSuite on Windows and Windows Server.
This step-by-step guide consists of three steps including:
- Step 1: Add Windows Backup Repository
- Step 2: Add target Windows machine
- Step 3: Configure backup
Step 1: Add Windows Backup Repository
To begin creating backup copies, you should first ensure that you have a place to store them. We refer to this as a backup repository.
- Open the BDRSuite web console and log in.
- Click on Backup Server and then click Block Storage.

- Click on Create New Storage Repository.
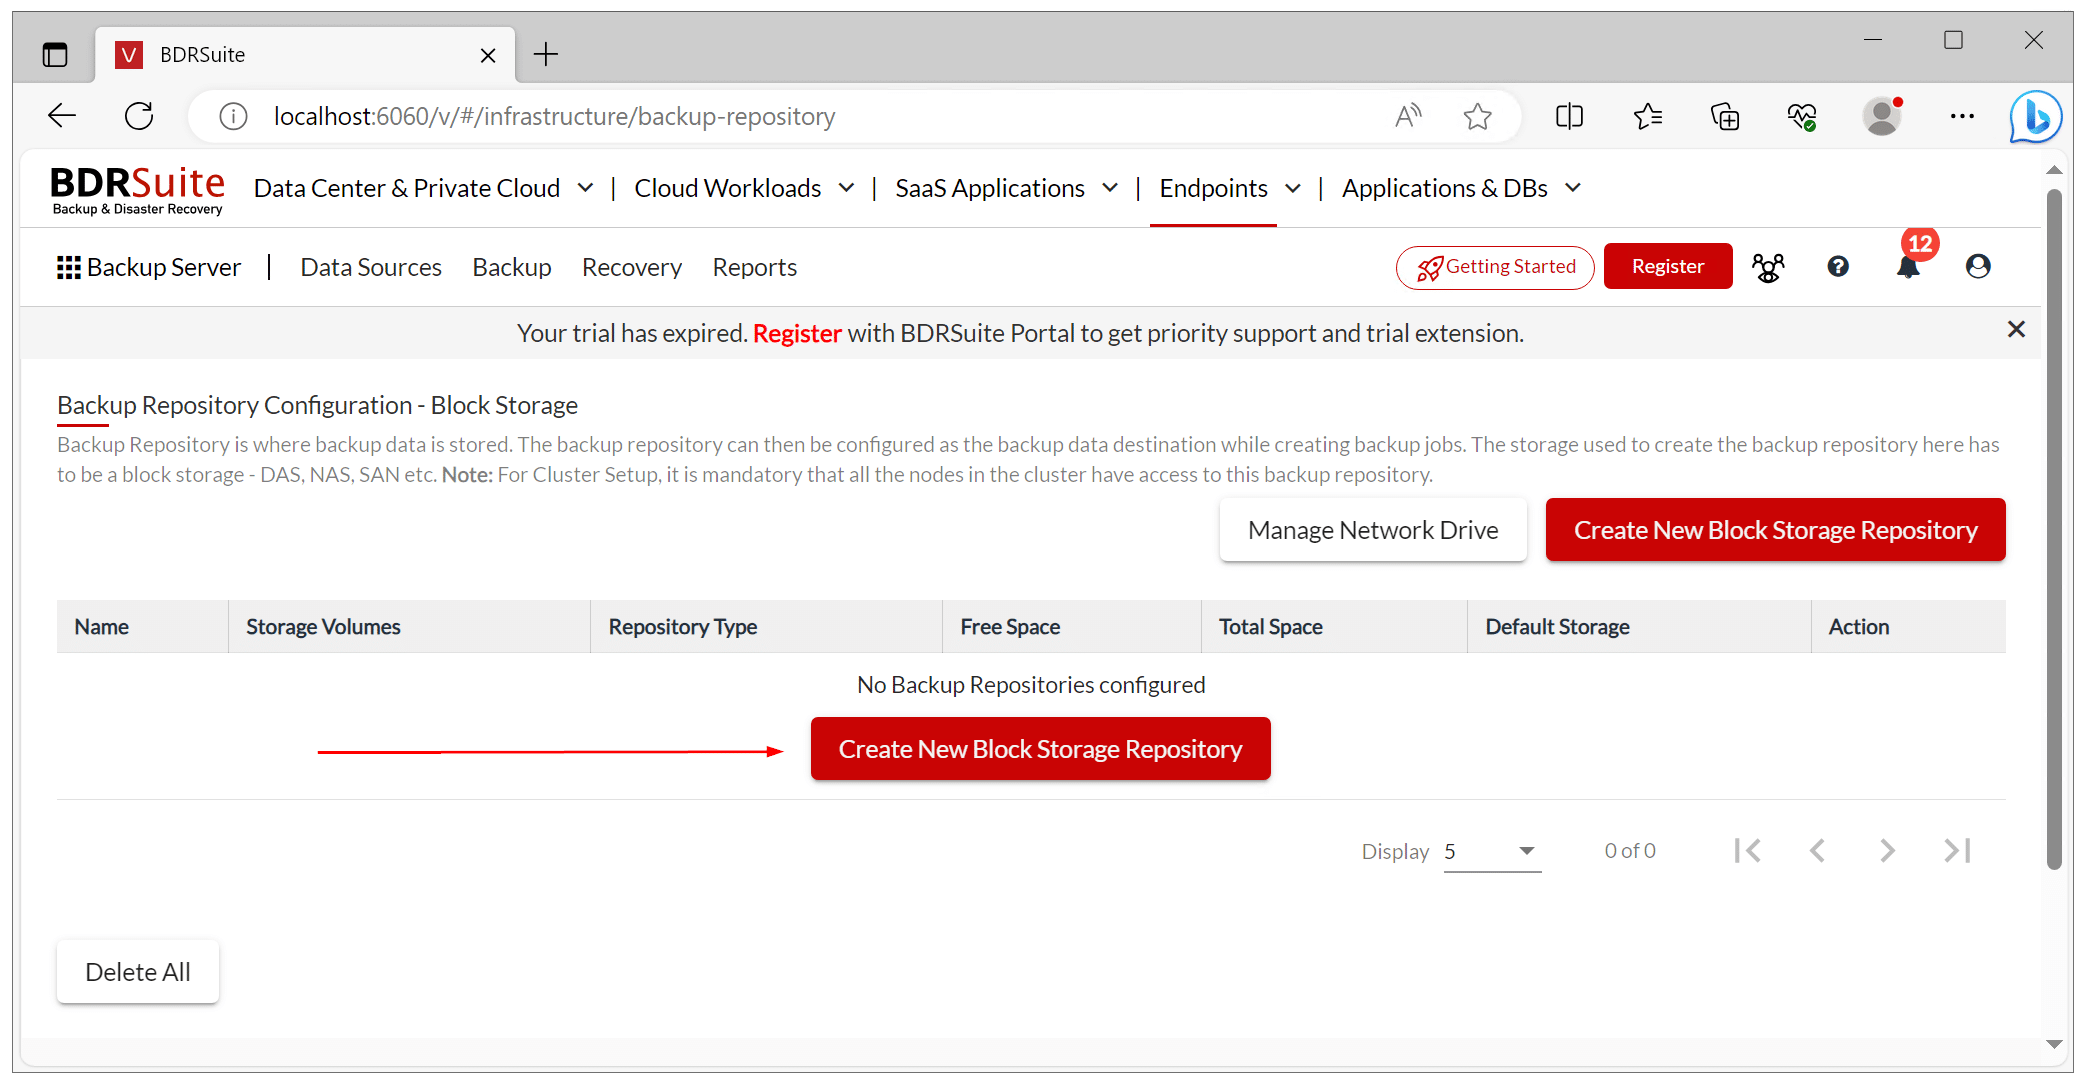
- Enter the repository name, repository type and select the storage volume where you want to store backup copies, and then click Create.
- Click Confirm to confirm creating a new repository drive.
Note: In my testing environment, I store backup copies on a secondary disk attached to my machine. In the production environment, it is recommended to use a network drive. In order to add it, you click on Add Network Drive as Storage Volume in the previous screenshot and enter the drive path, drive name, username, and password.
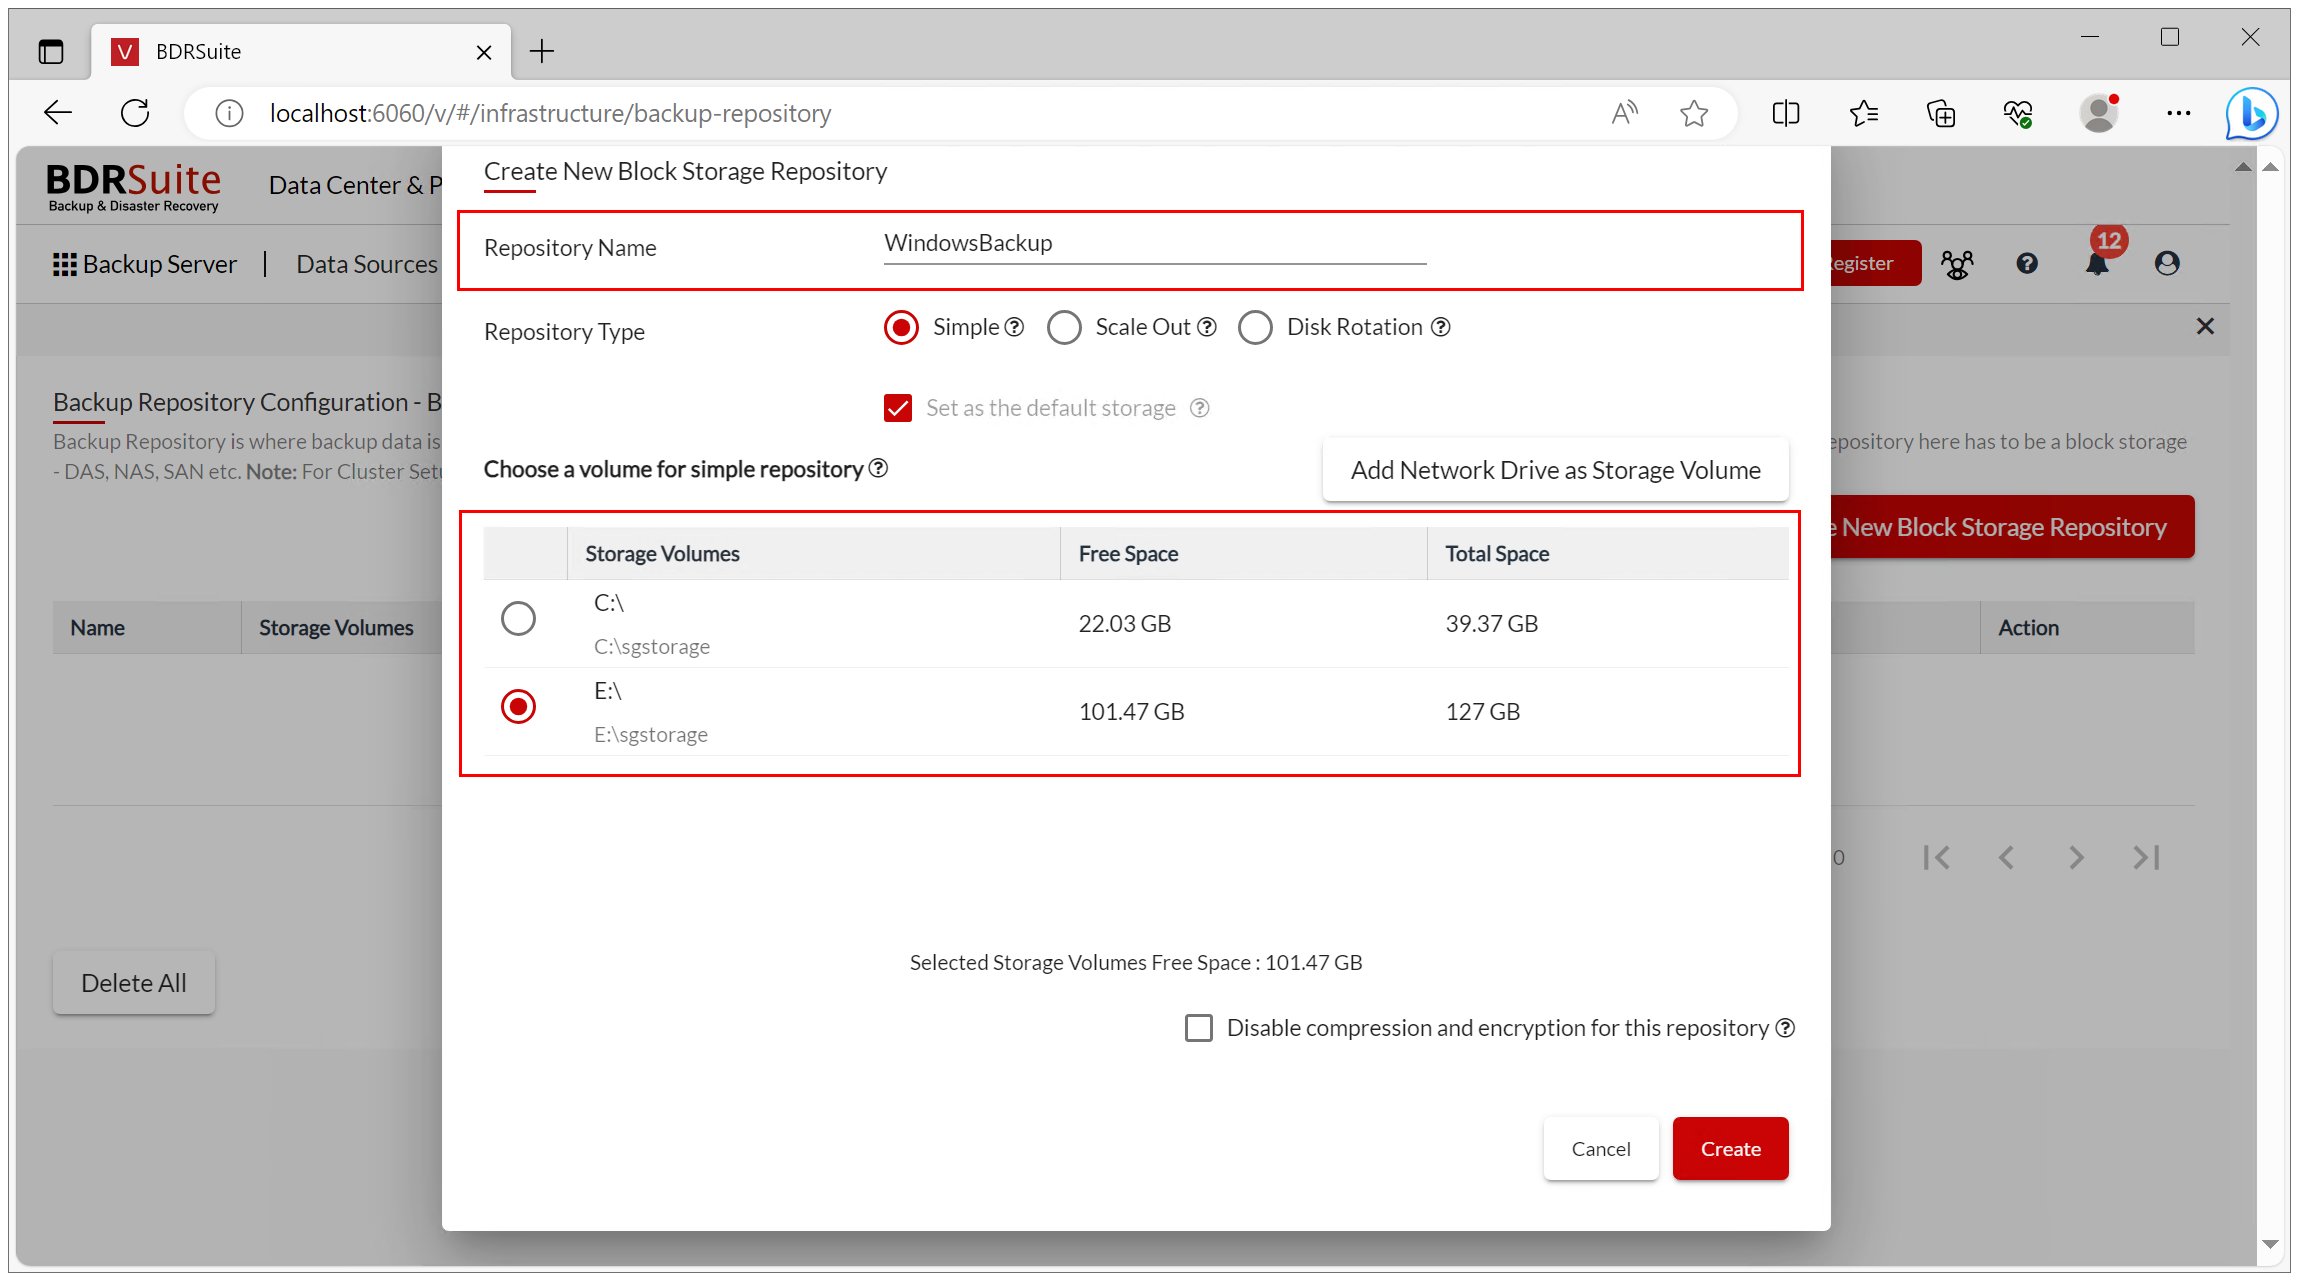
Once created, your repository will be listed under block storage.
Step 2: Add target Windows machine
In the second step, you need to add the target Windows or Windows Server machine you want to back up.
- If you close the BDRSuite UI or sign out, open the BDRSuite web console and log in.
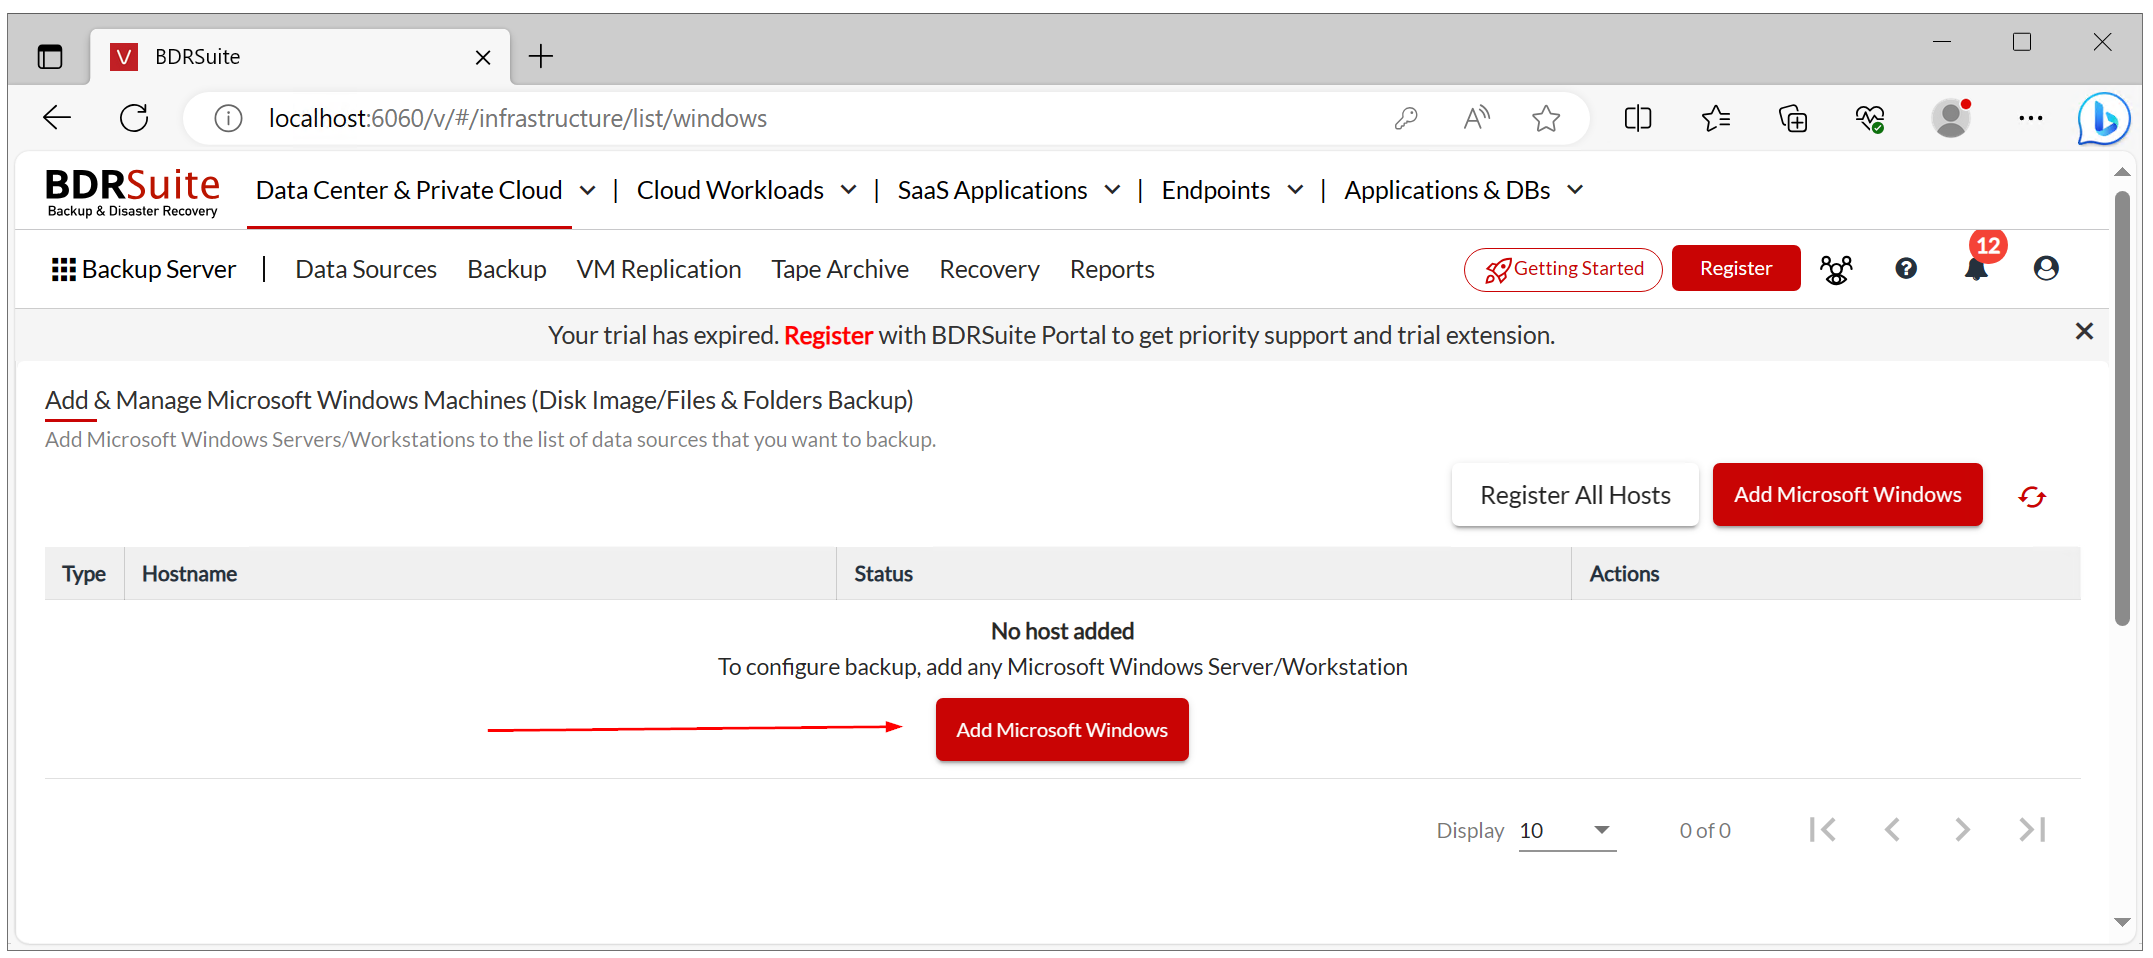
- Click Data Sources and then click Add Microsoft Windows.
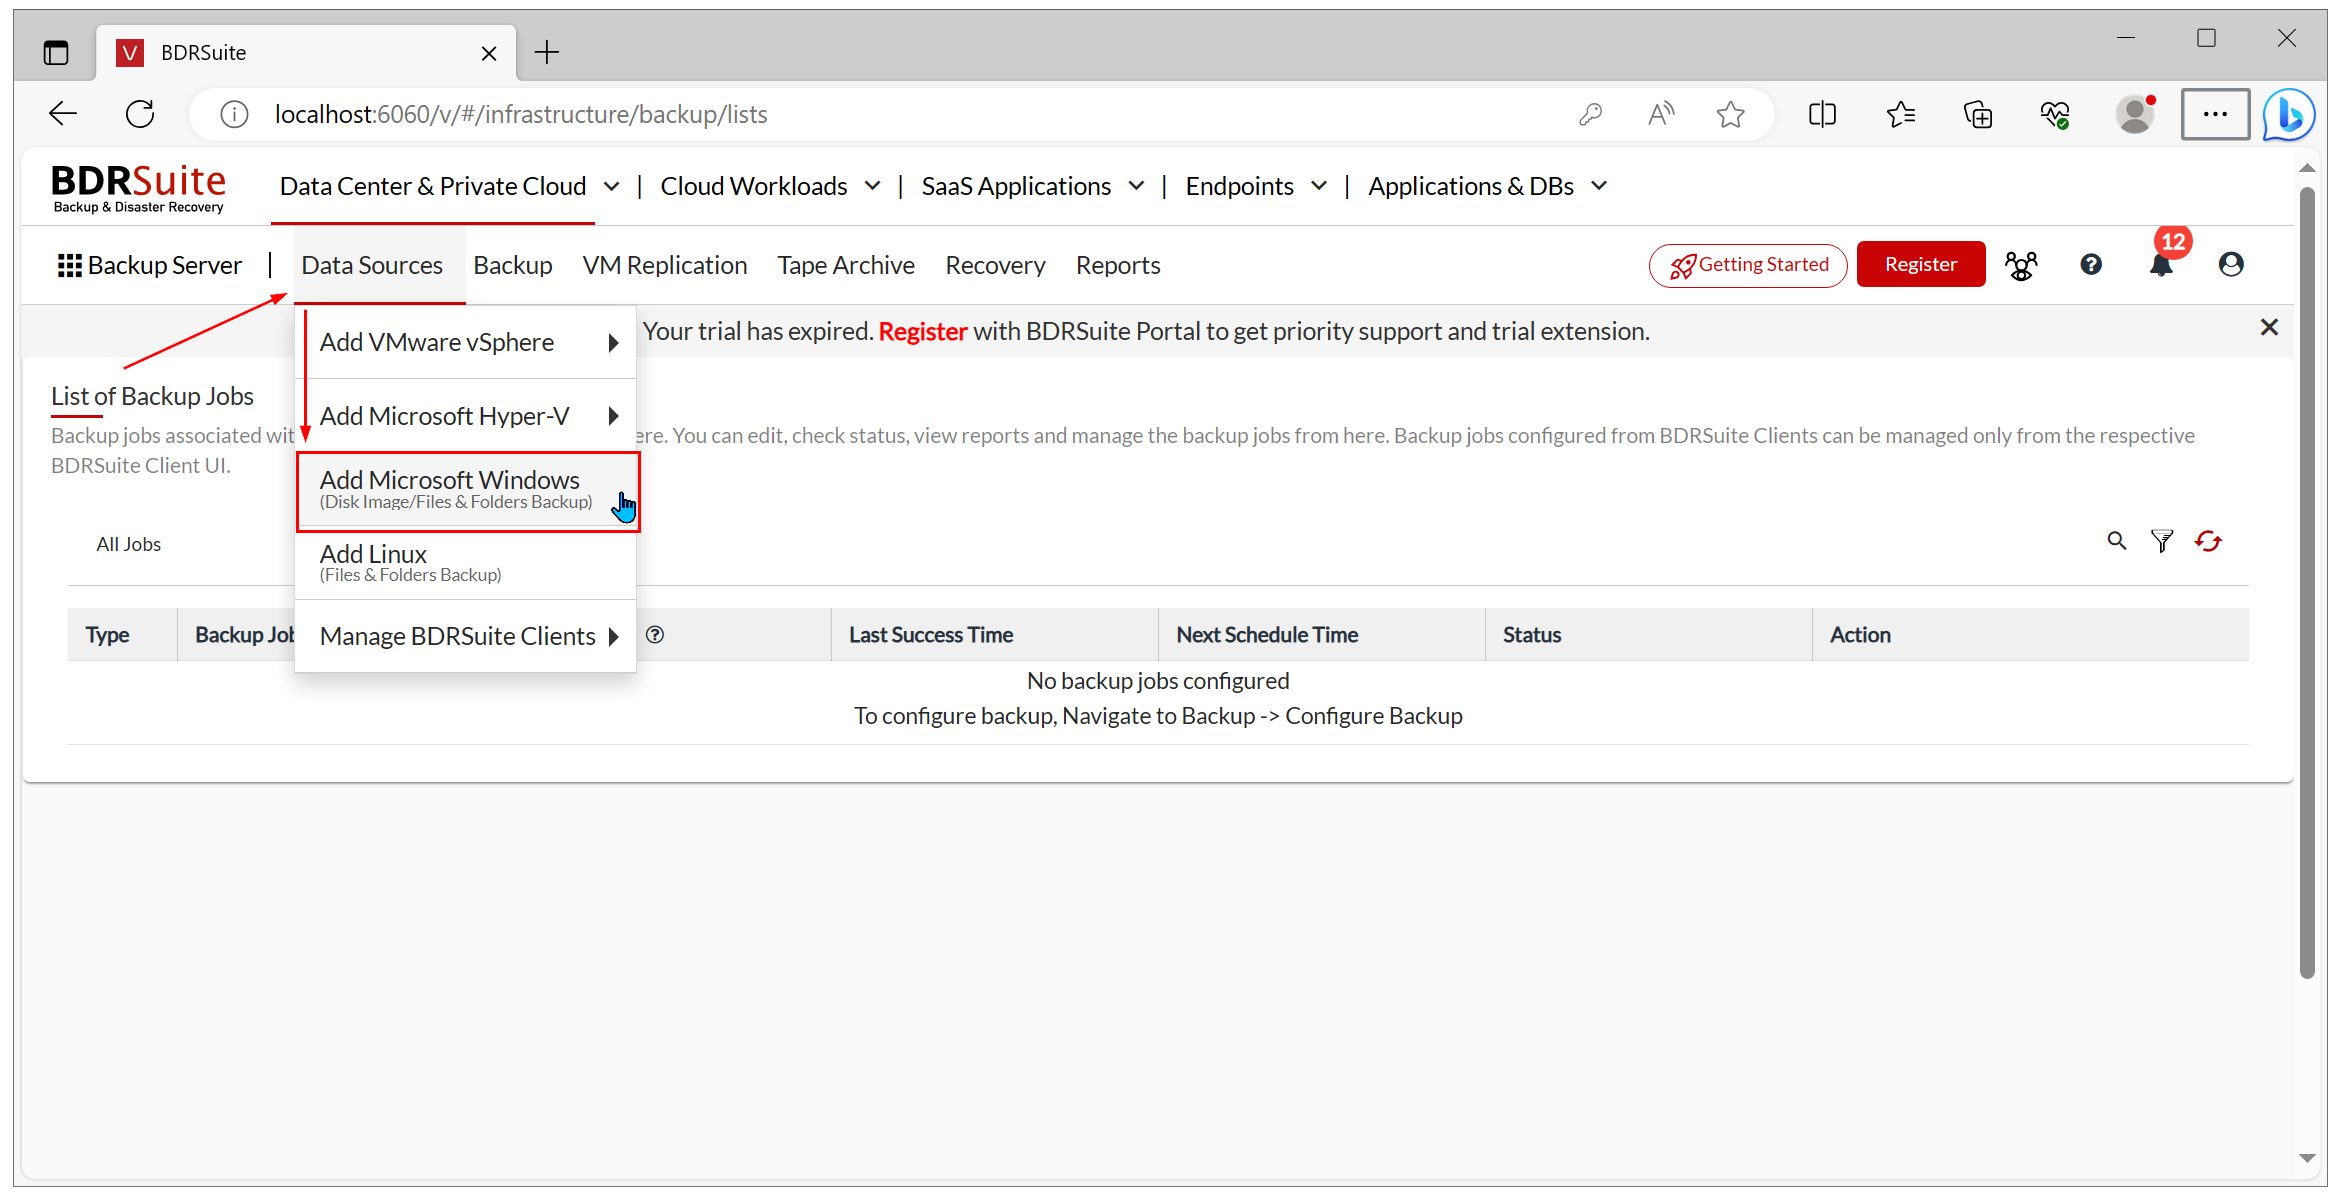
- Click Add Microsoft Windows.
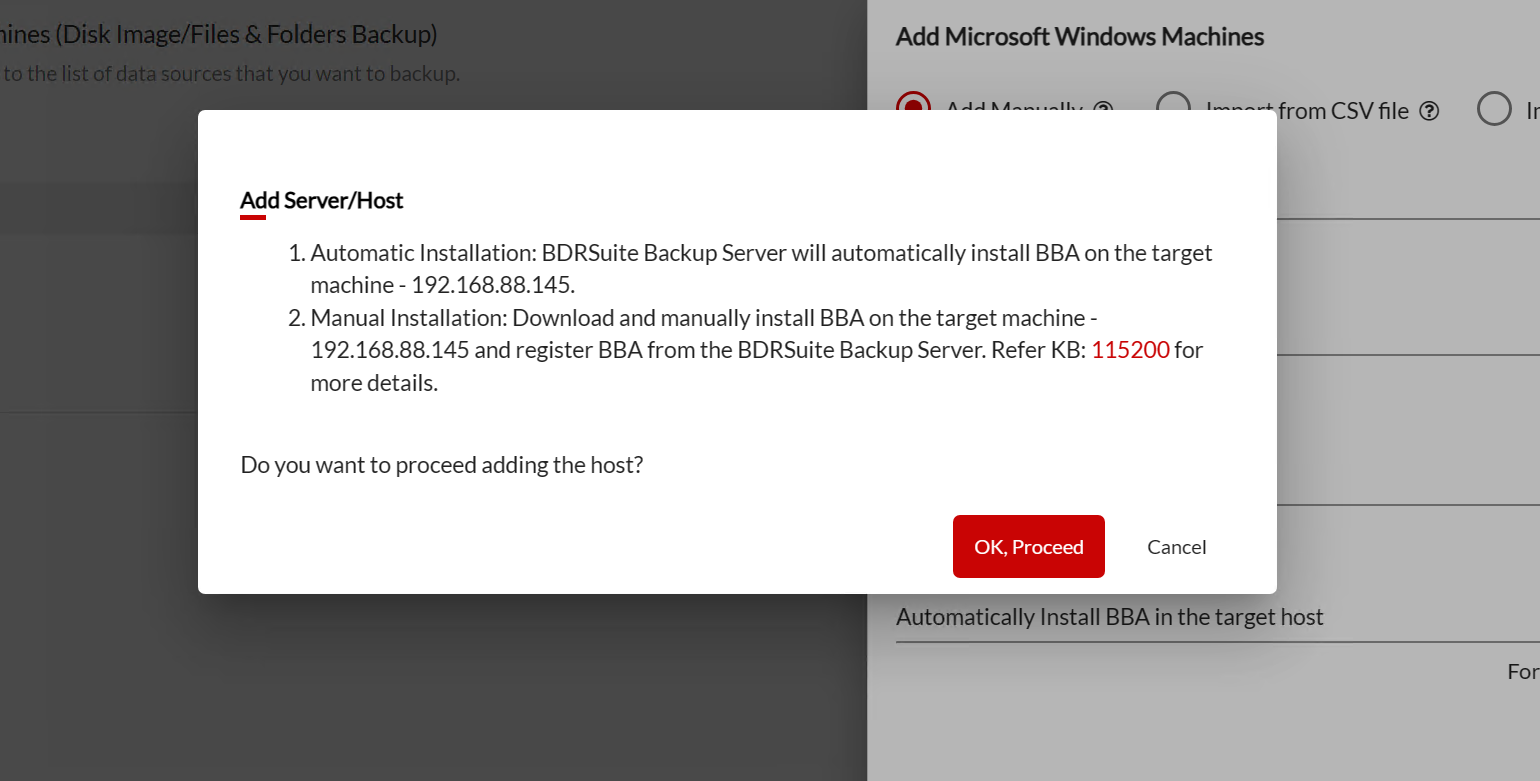
- Enter IP or FQDN, and then click Add Credentials. BDRSuite will use credentials to access the target Windows machine and install the BBA agent responsible for backing up the data or image. BDRSuite will install the BBA agent automatically. However, you have the option to install it manually if you prefer.
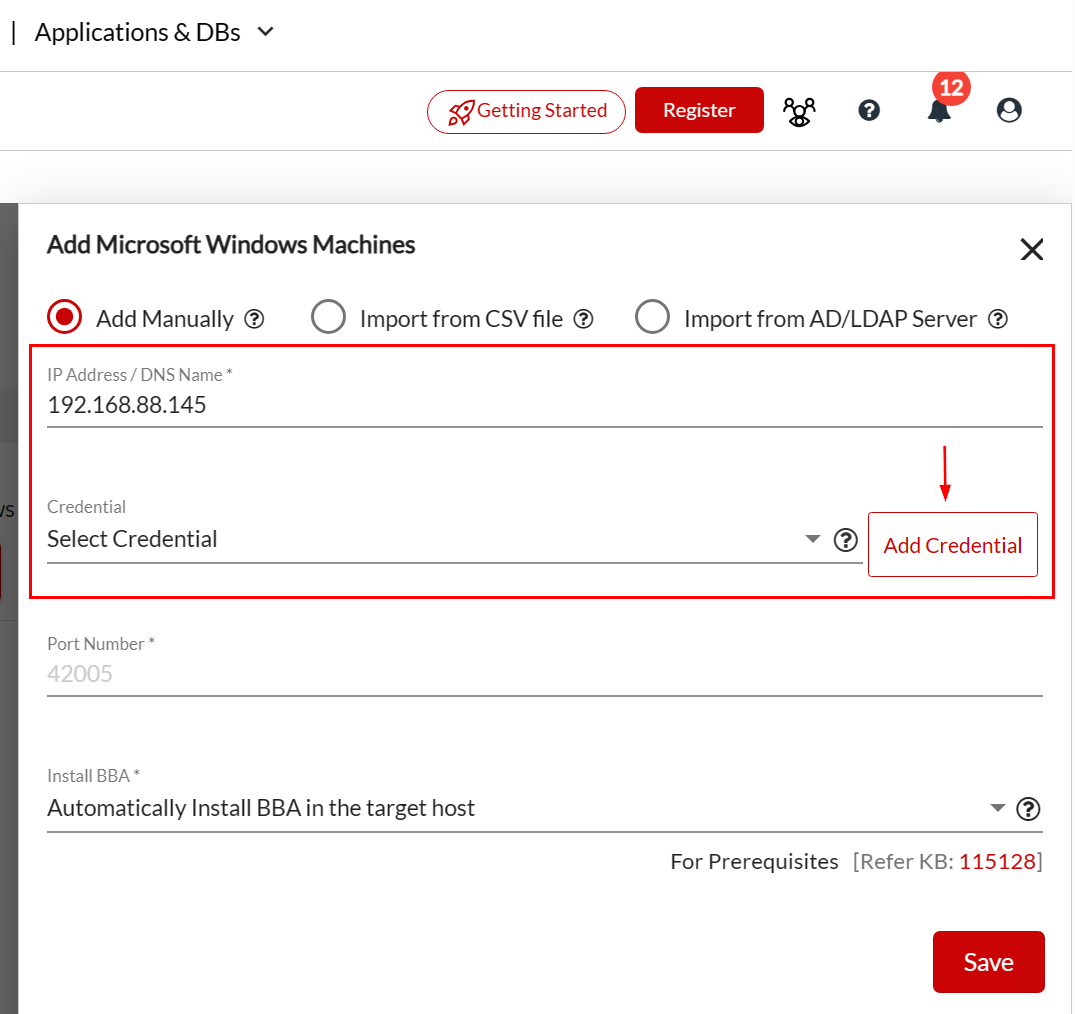
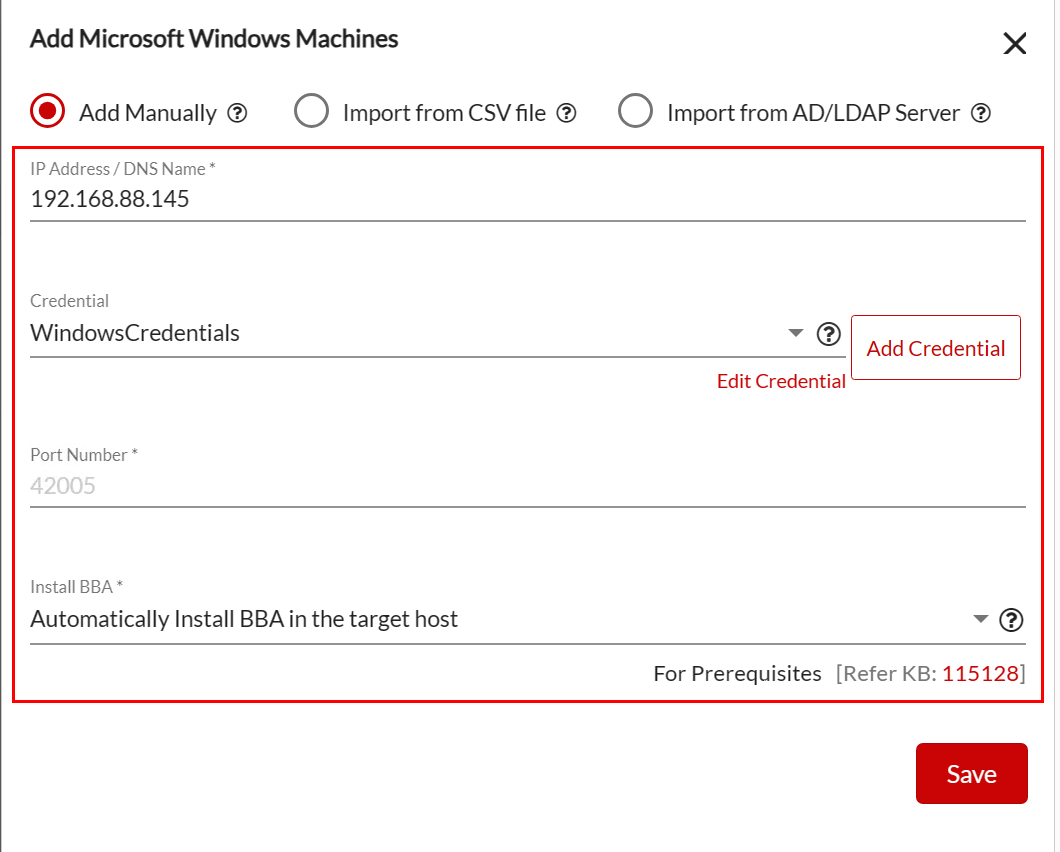
- Enter your credential name, username, and password, and click Save.

- You will be returned to the previous step, and your credentials will be selected under Credential. If you have multiple credentials, please ensure you selected the right one. Click Save.
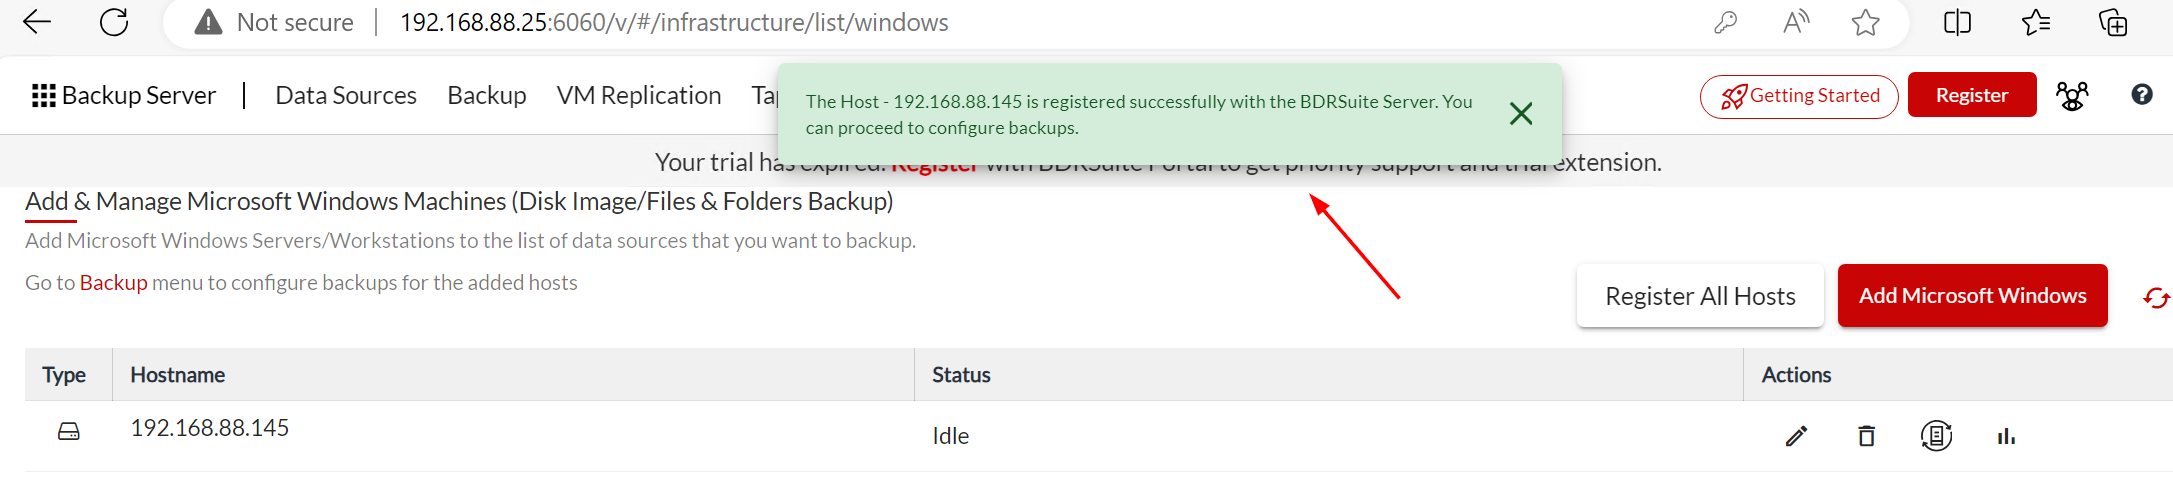
- Click OK, Proceed to confirm adding the host.
- Wait until the BBA agent is added and the connection between BDRSuite and target Windows is established.
Step 3: Configure backup
In the third step, we will configure backup and explain several available options.
- If you close the BDRSuite UI or sign out, open the BDRSuite web console and log in.
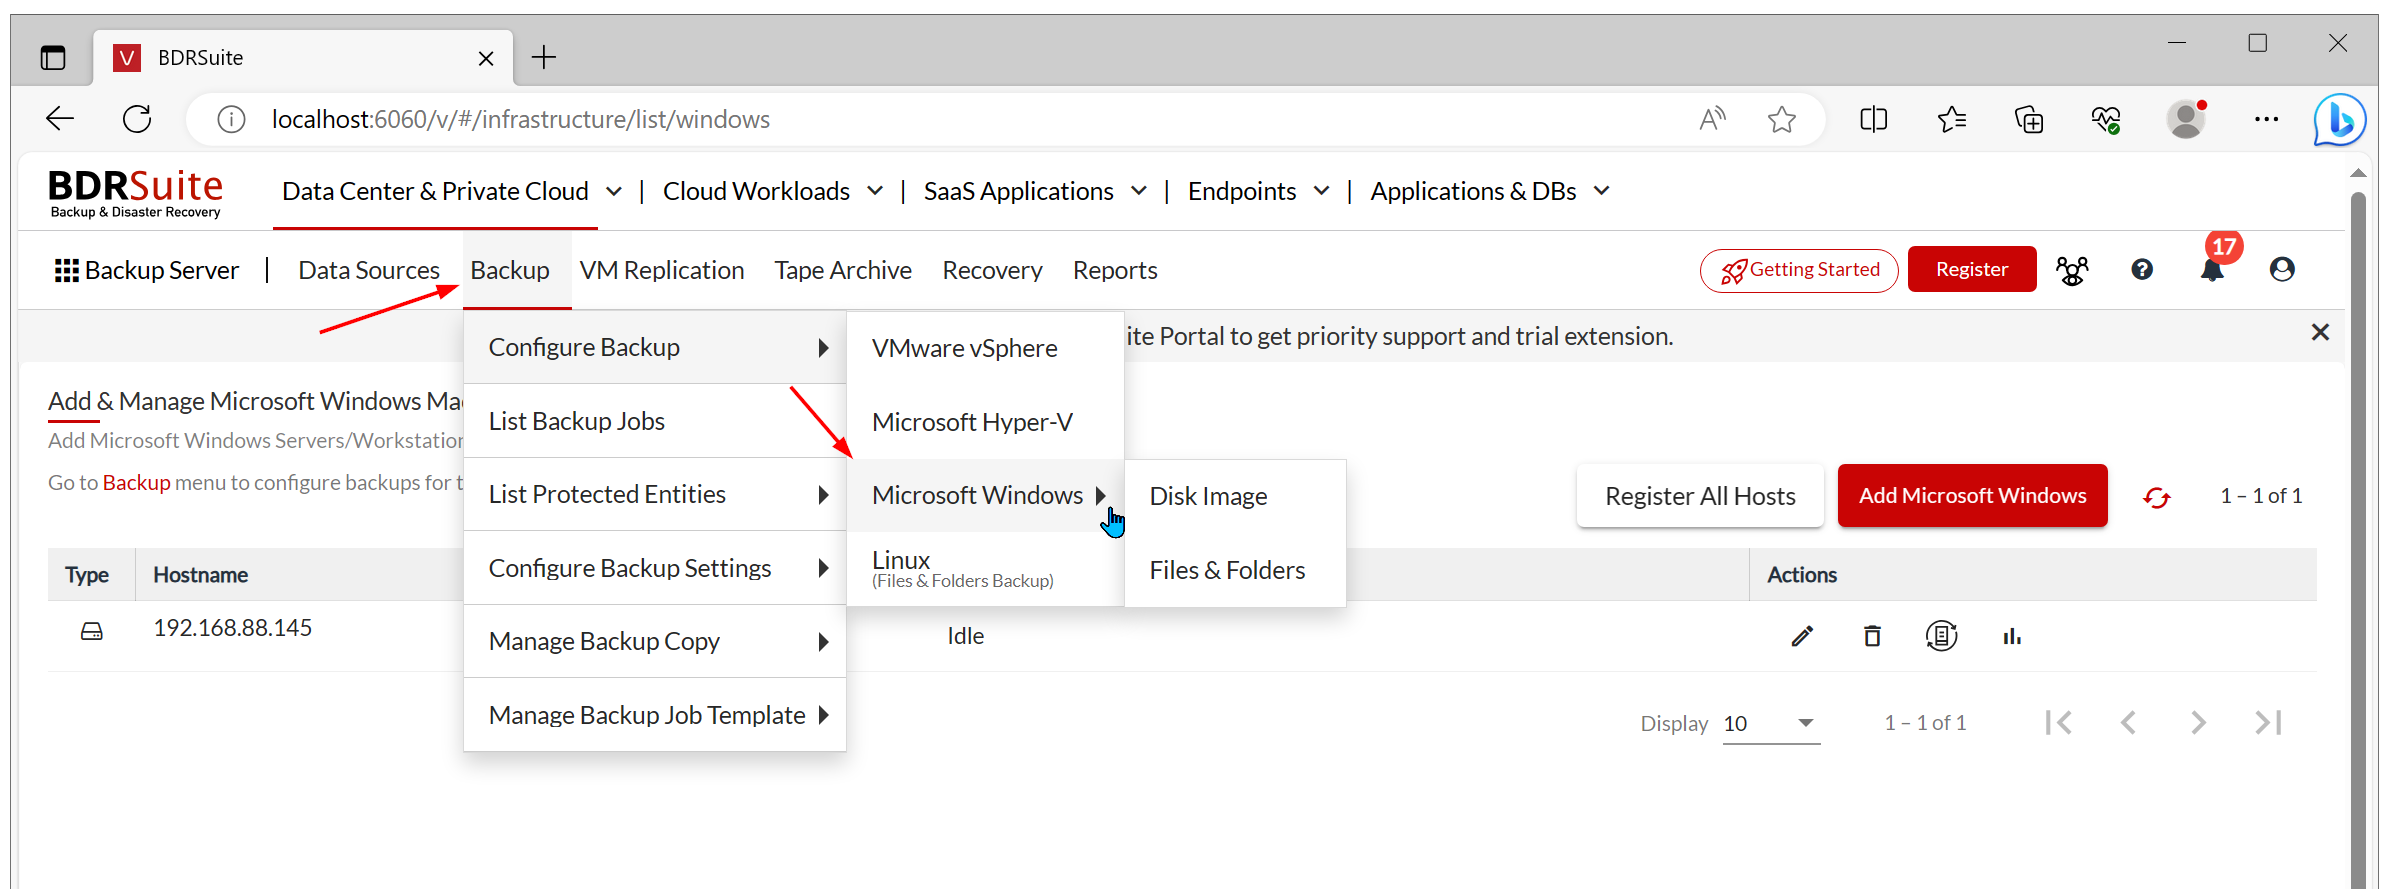
- Click on Backup > Configure Backup > Microsoft Windows. There are two options available, Disk Image and Files and folders. The Disk Image will perform a backup of the whole Windows image, and Files & Folders only selected data.
Disk Image Backup
Disk image backup helps you to backup the entire disk or volume.
- If you close the BDRSuite UI or sign out, open the BDRSuite web console and log in.
- Select Disk Image.
- On the left side, under the Choose Job Create Option, select Create Job without using a Template.
- Enter the backup job name, select the backup repository you created in the first step of this article, and enter a job description (optional). Then, click Next::Files/Folders Selection Processing.

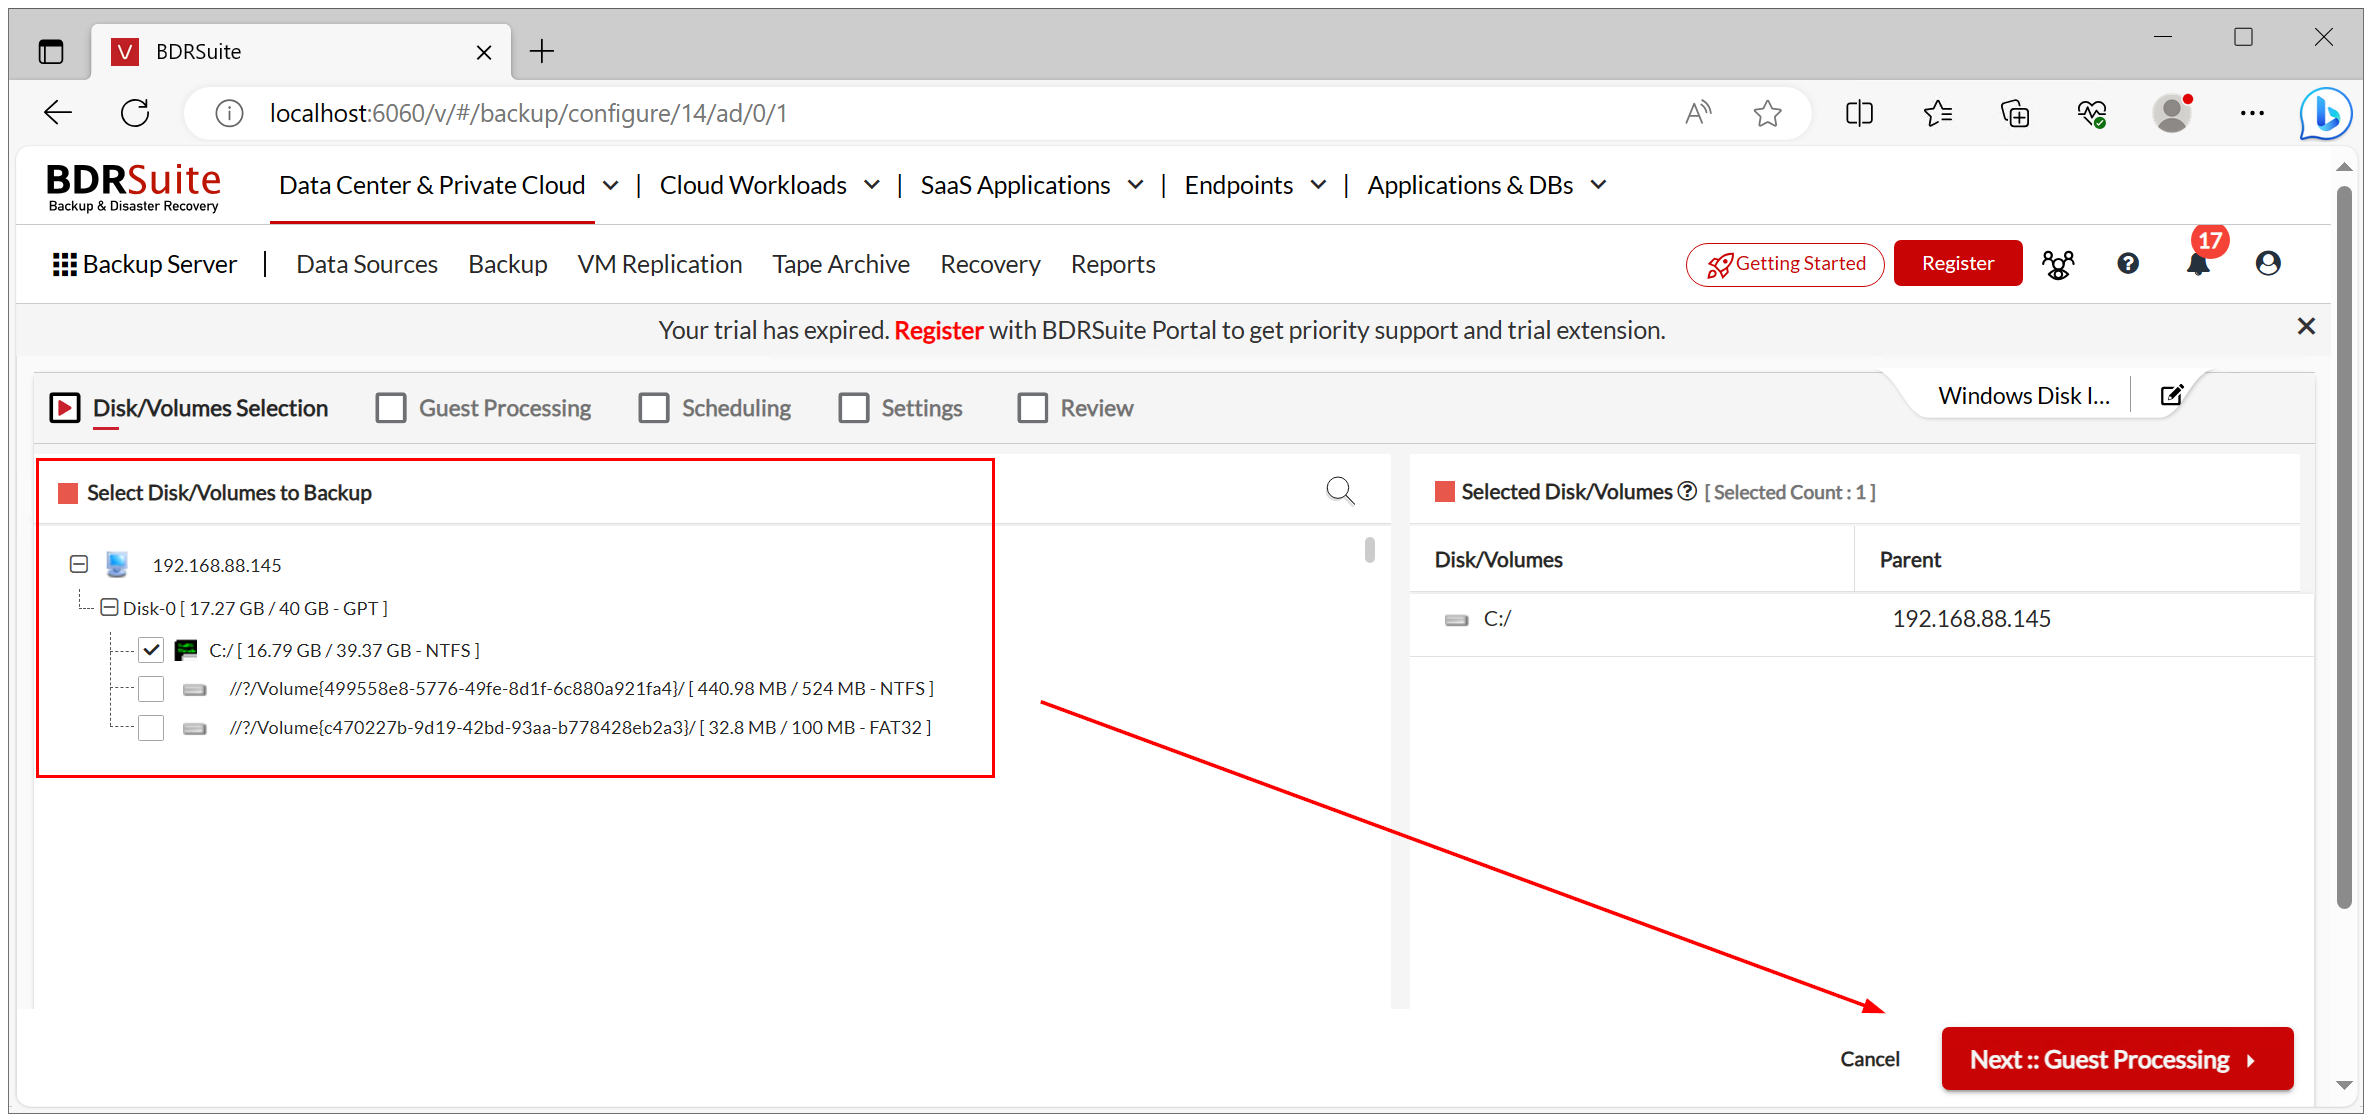
- Select disk/volume to backup by clicking on + next to the IP or DNS of your target Windows machine. Please note that BDRSuite – Backup for Microsoft Windows requires a BDRSuite CBT Driver to be installed in the Windows machine(s) selected for backup. Installing the driver requires a reboot of the machine.
If the BDRSuite CBT Driver is not installed, BDRSuite will offer to install it for you. All you need to do is click OK to proceed with the installation and wait until the reboot is finished.

- Once the CBT driver is installed, you will be able to expand your machine and select the disk or volume you want to back up. In my case, I selected disk C:/. Then, click Next::Guest Processing.
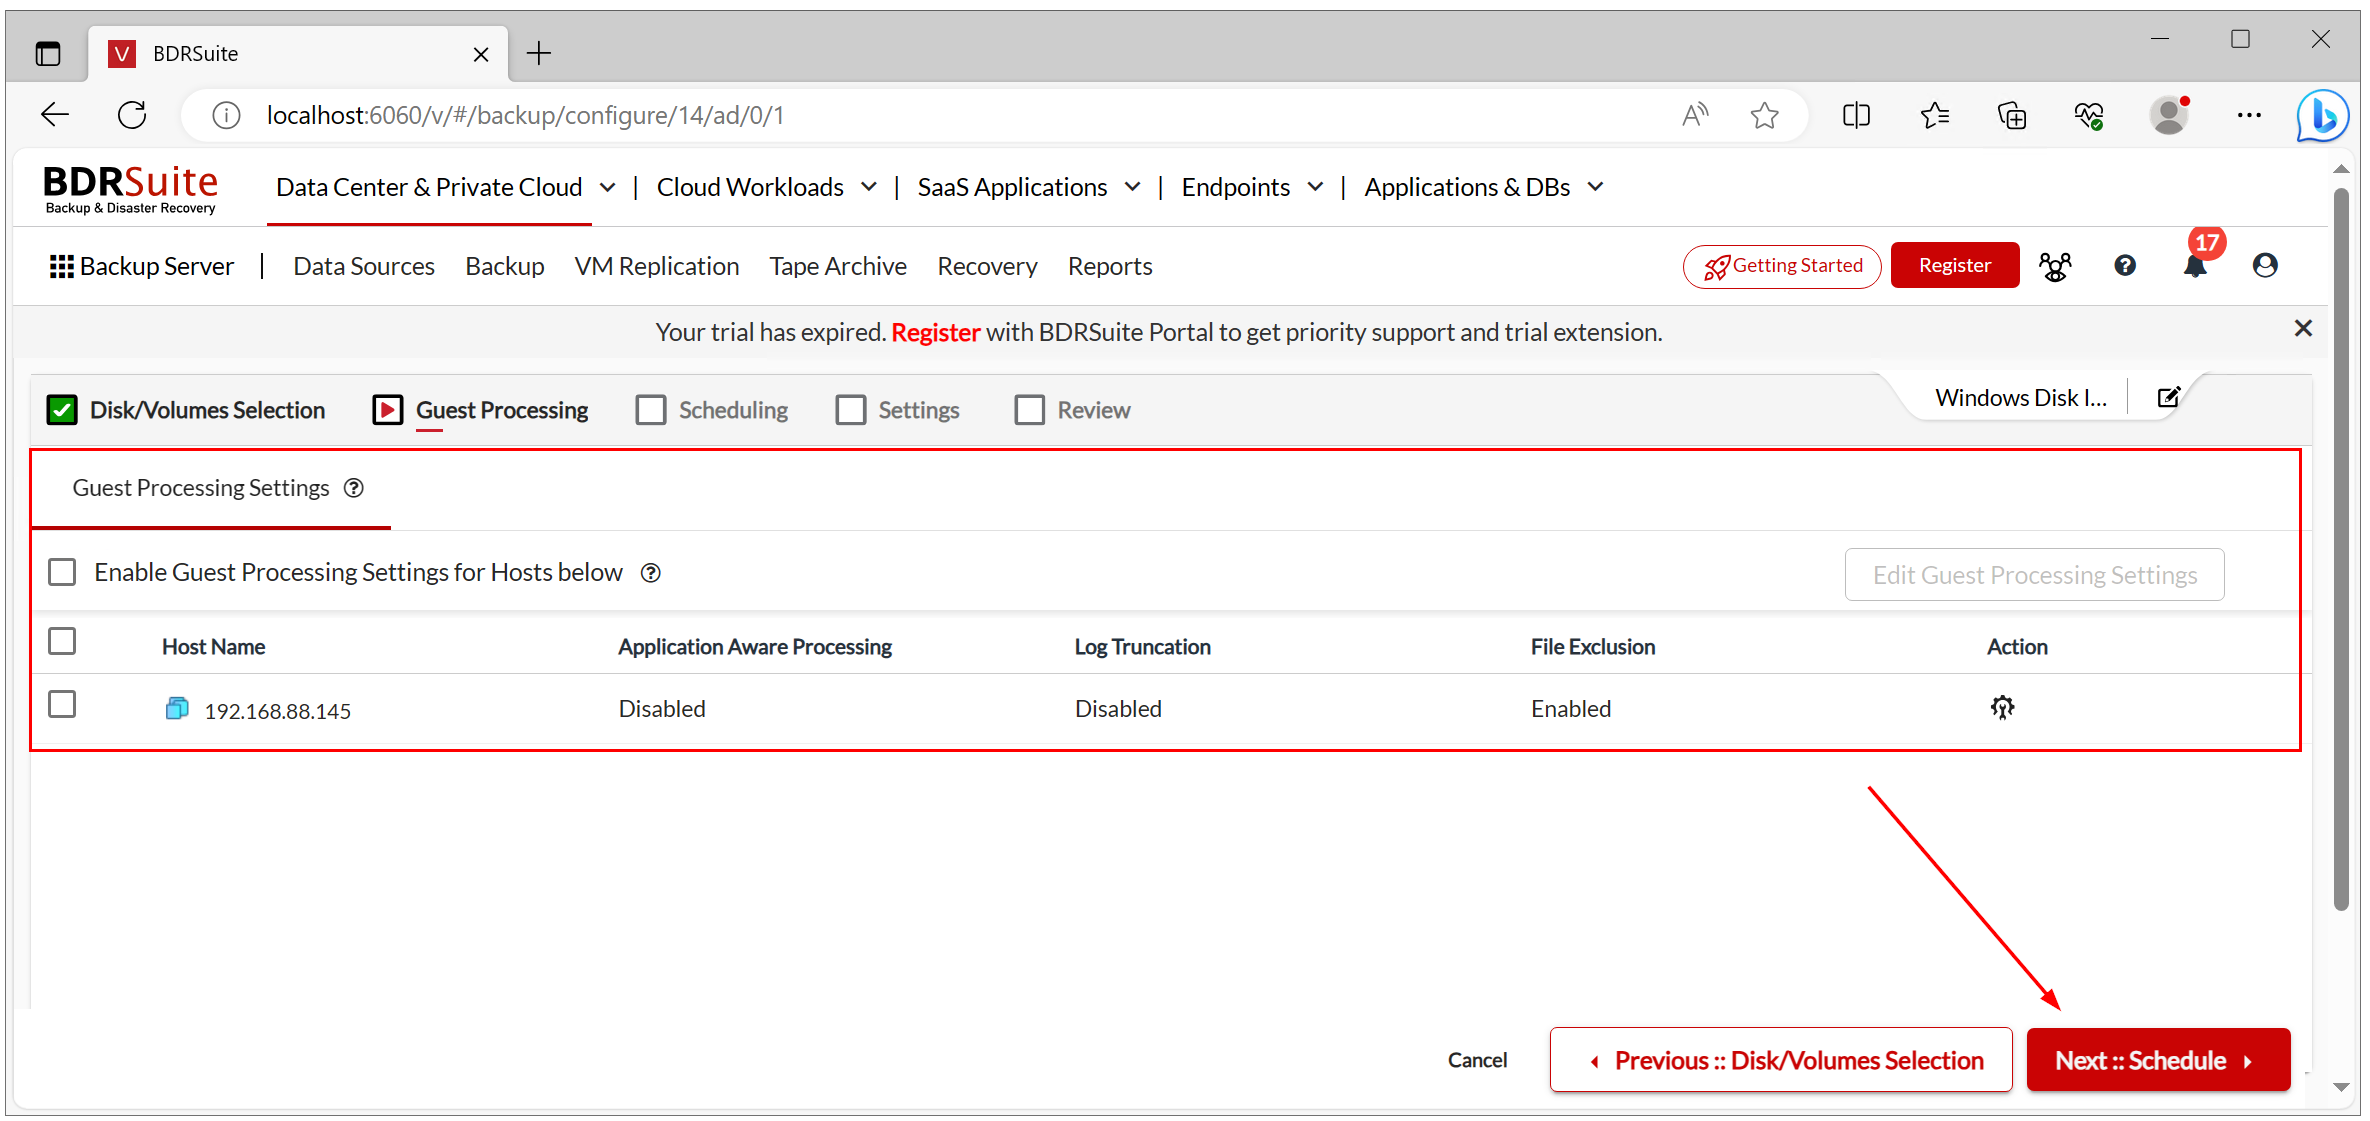
- Additionally, you can enable guest processing settings or skip it. Guest Processing Settings ensures application consistent backup, transaction log truncation, and system file exclusion. Then, click Next::Schedule.
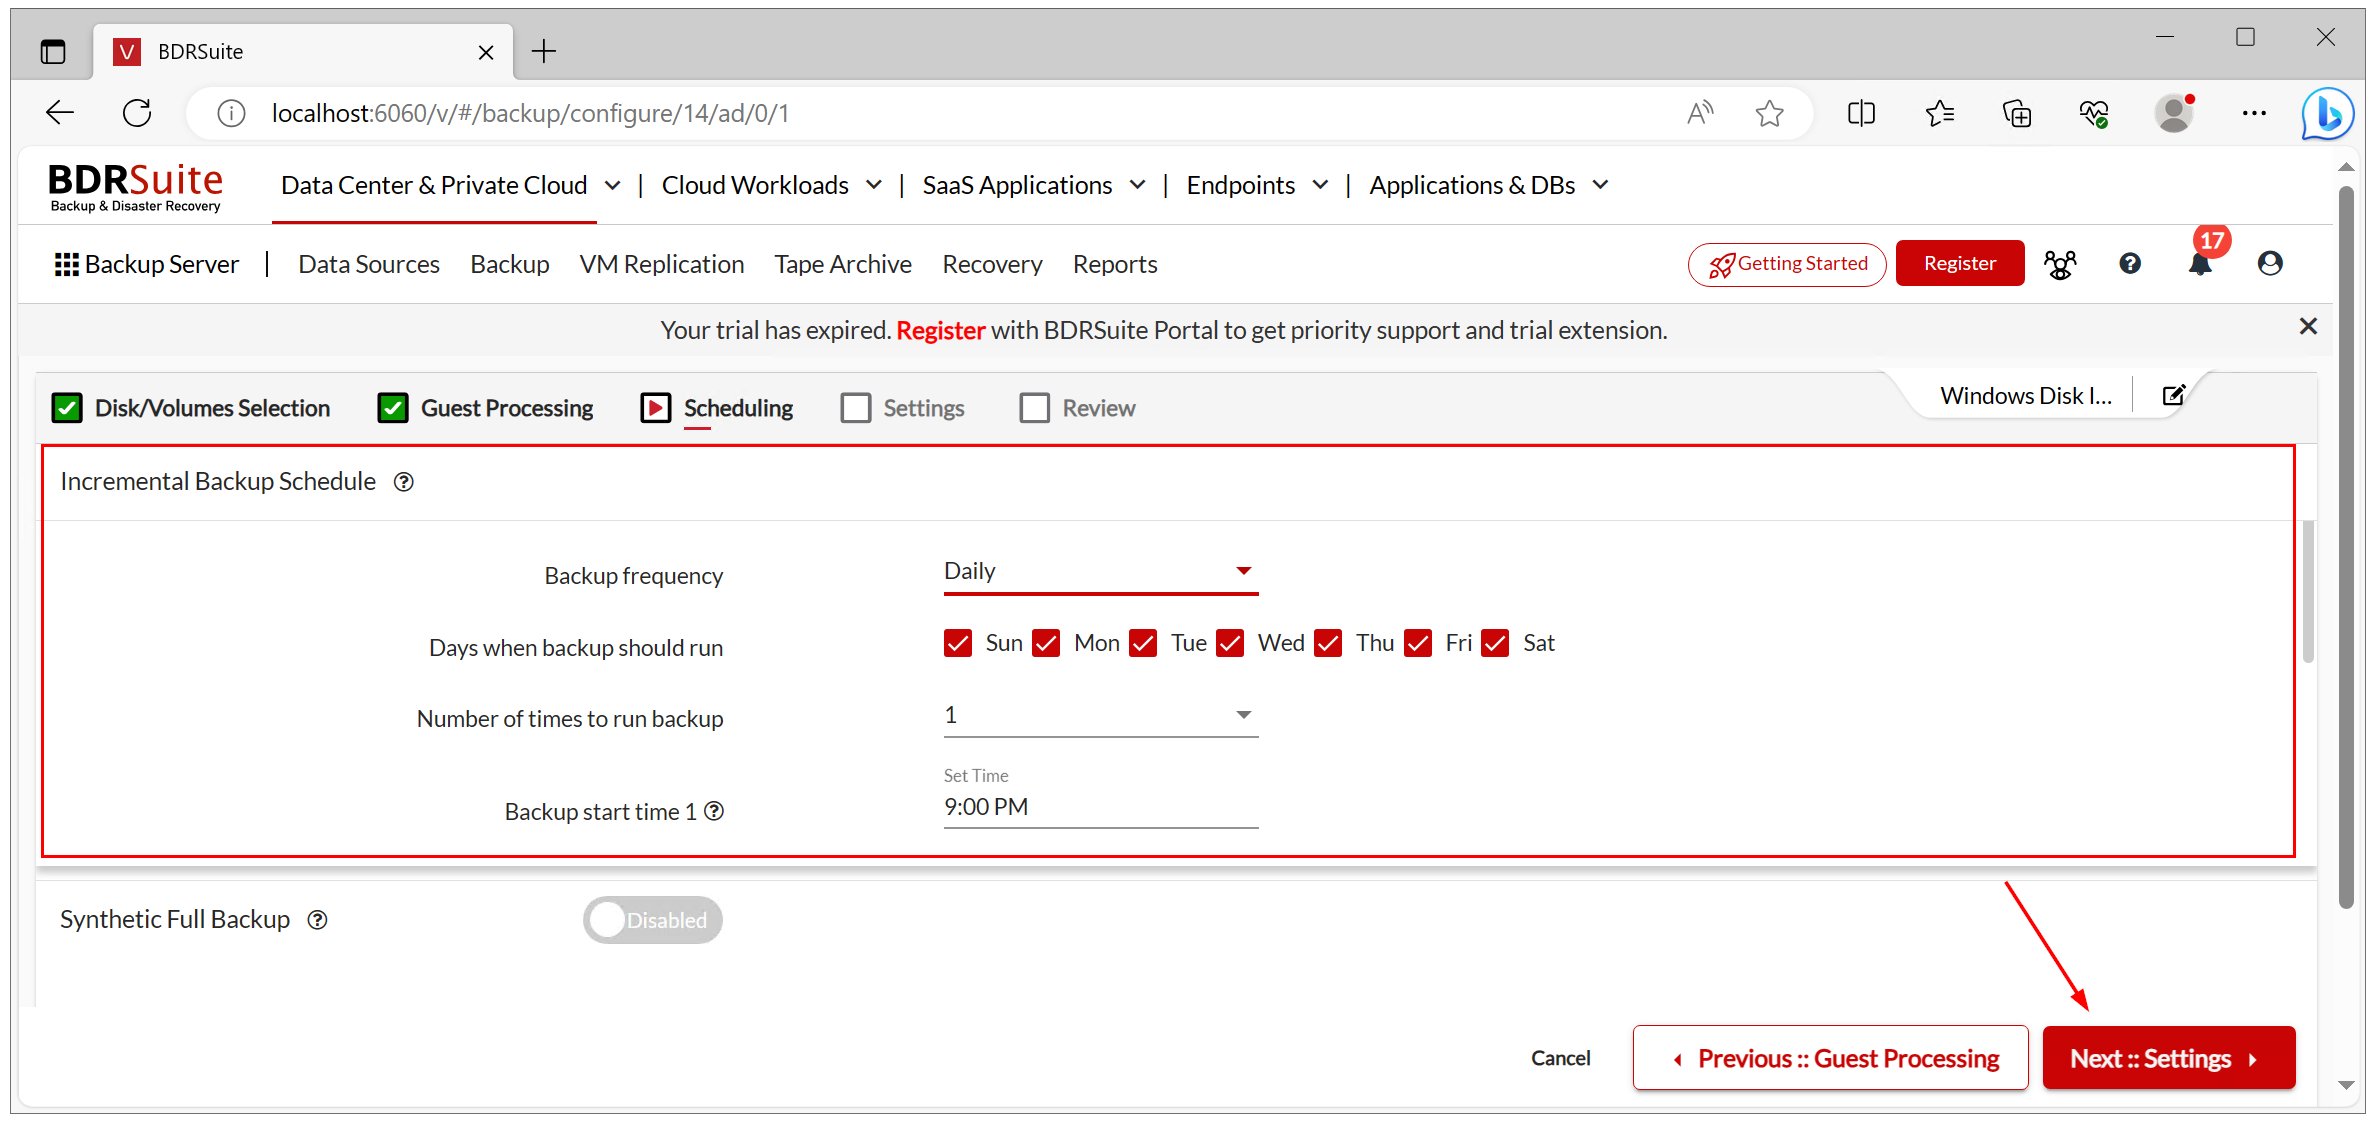
- Choose the backup frequency how often and when you want to create a backup of your Windows image. In my case, I chose daily backup at 9 p.m., which is outside of the working hours. Then, click Next::Settings.
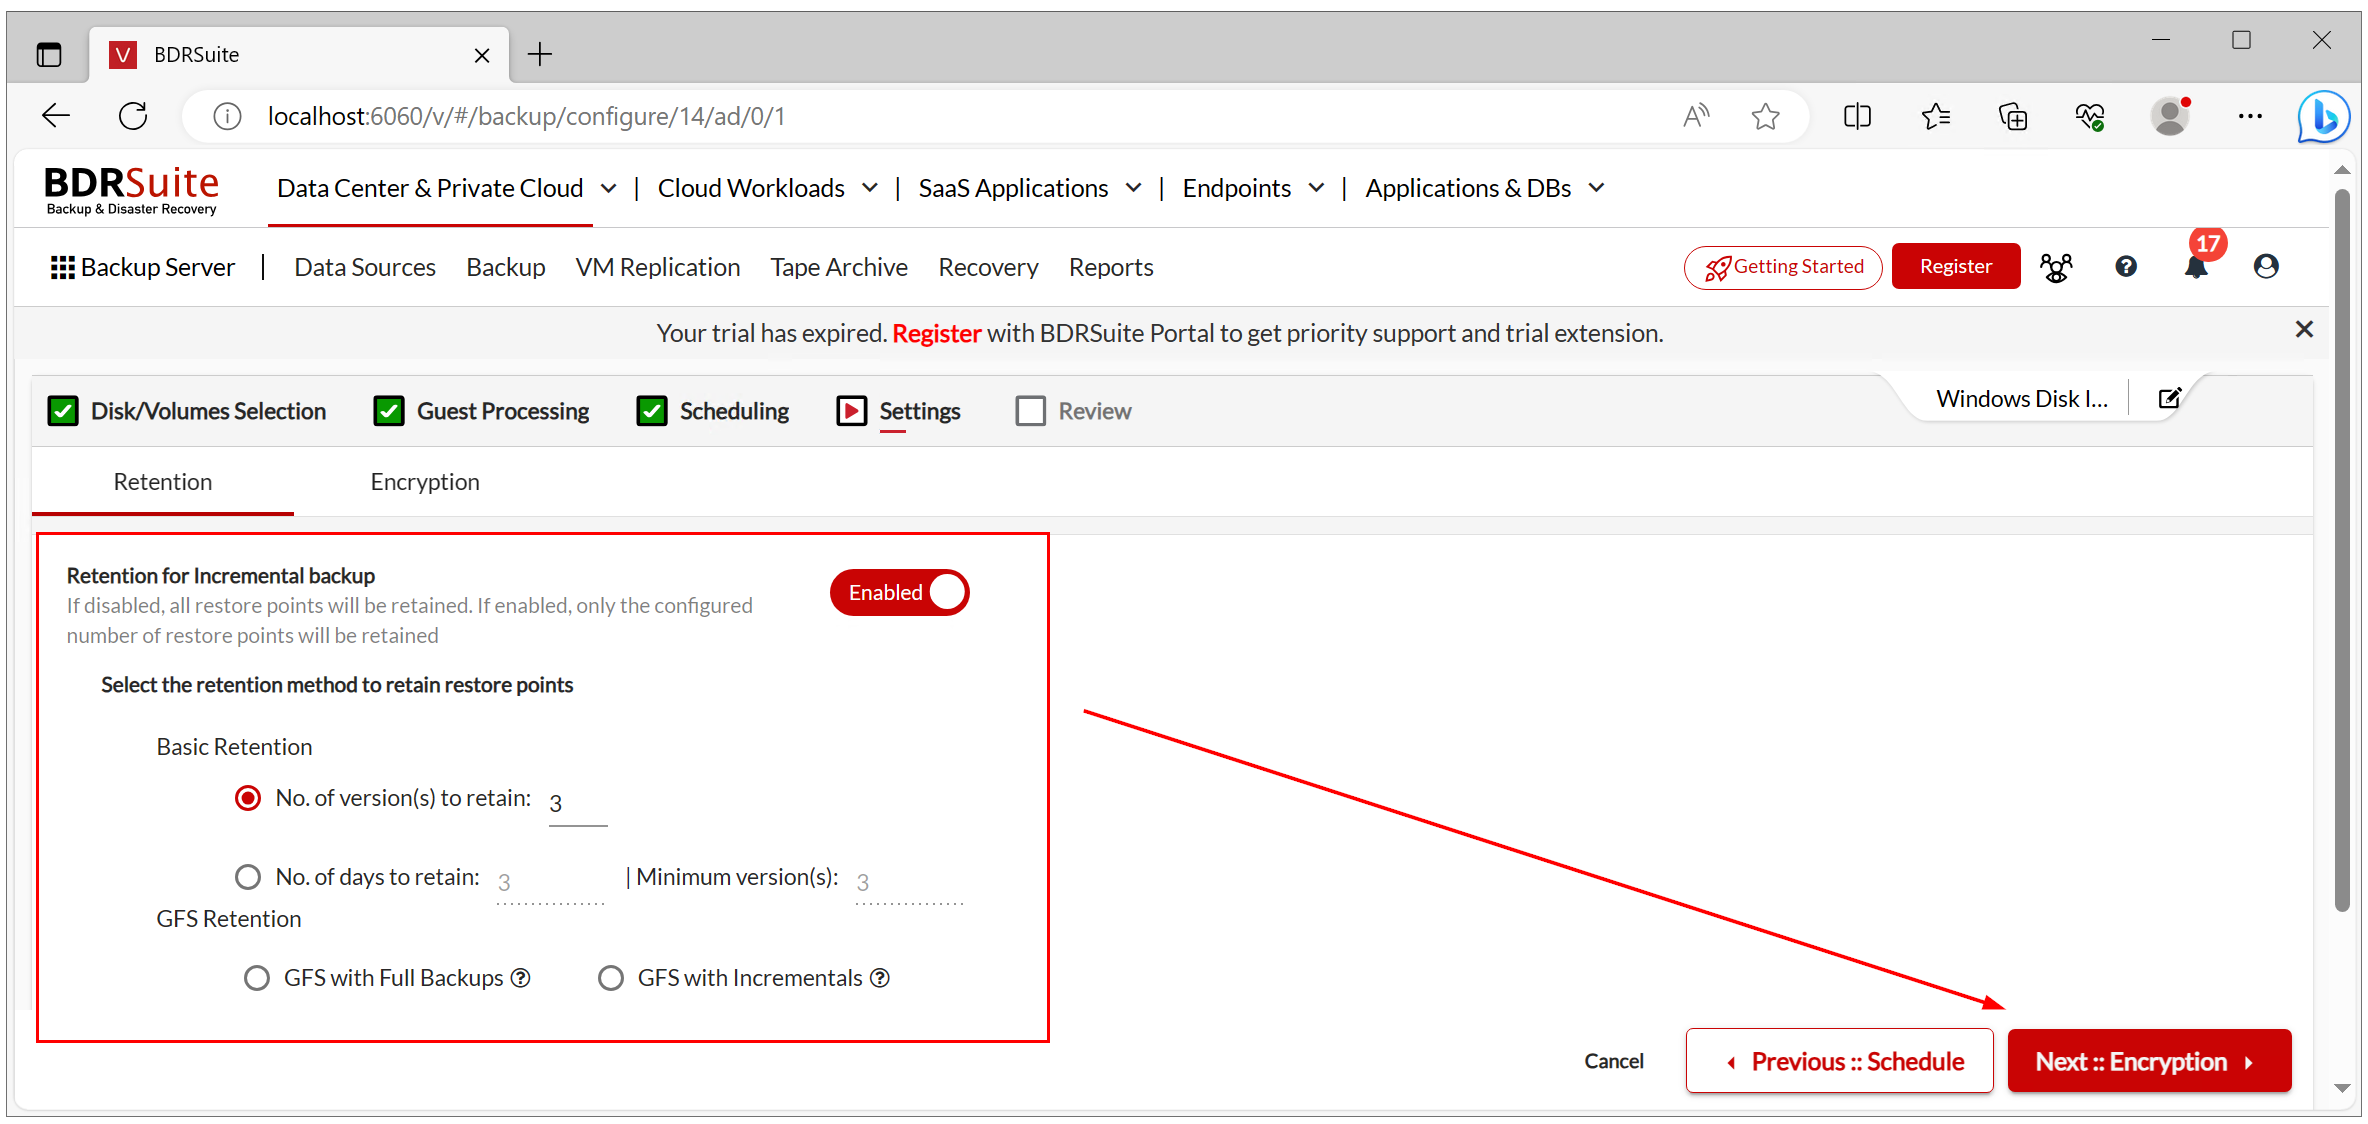
- Optionally, you can enable retention. If disabled, all restore points will be retained. If enabled, only the configured number of restore points will be retained.
Additionally, you can select the GFS retention policy and choose between GFS with Full Backups or GFS with Incrementals.
Then, click Next::Encryption.
- Optionally, you can enable encryption to protect your backup copies. You can protect it using system system-generated or custom password.
If you use a custom password, make sure you don’t lose this Password. Without this password, you will not be able to decrypt your backup data during restoration. The backup data is as good as lost.
Then, click Next::Review.

- Review the backup configuration, select Run this backup job immediately after saving, and click Save.
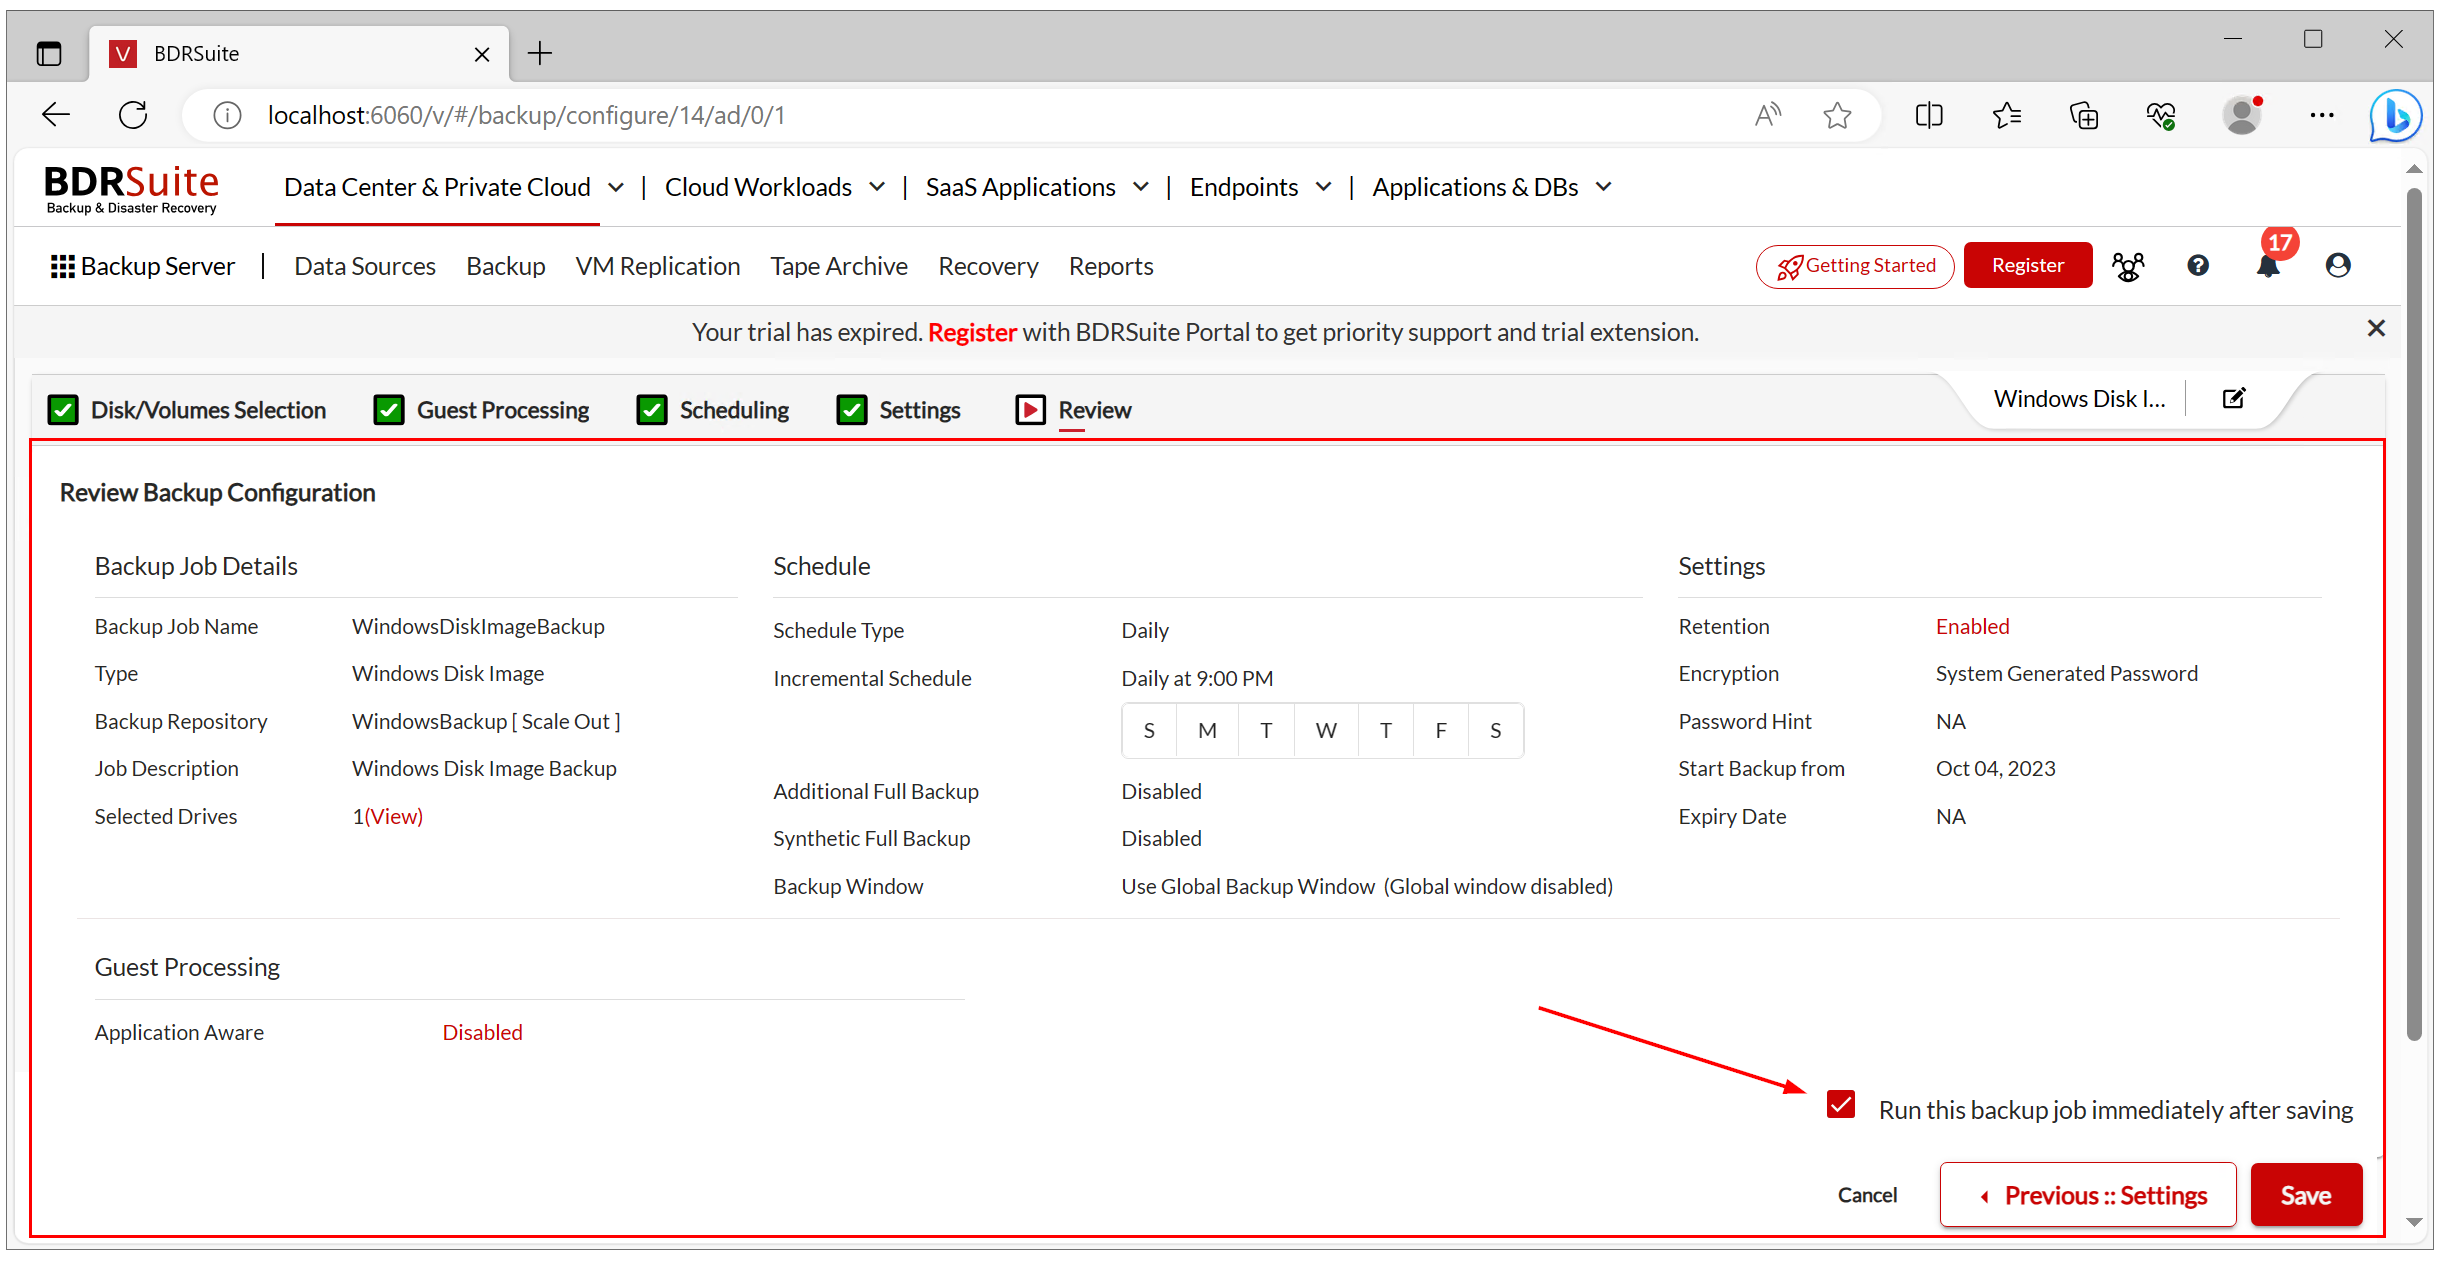
- Click Save to confirm the backup configuration.
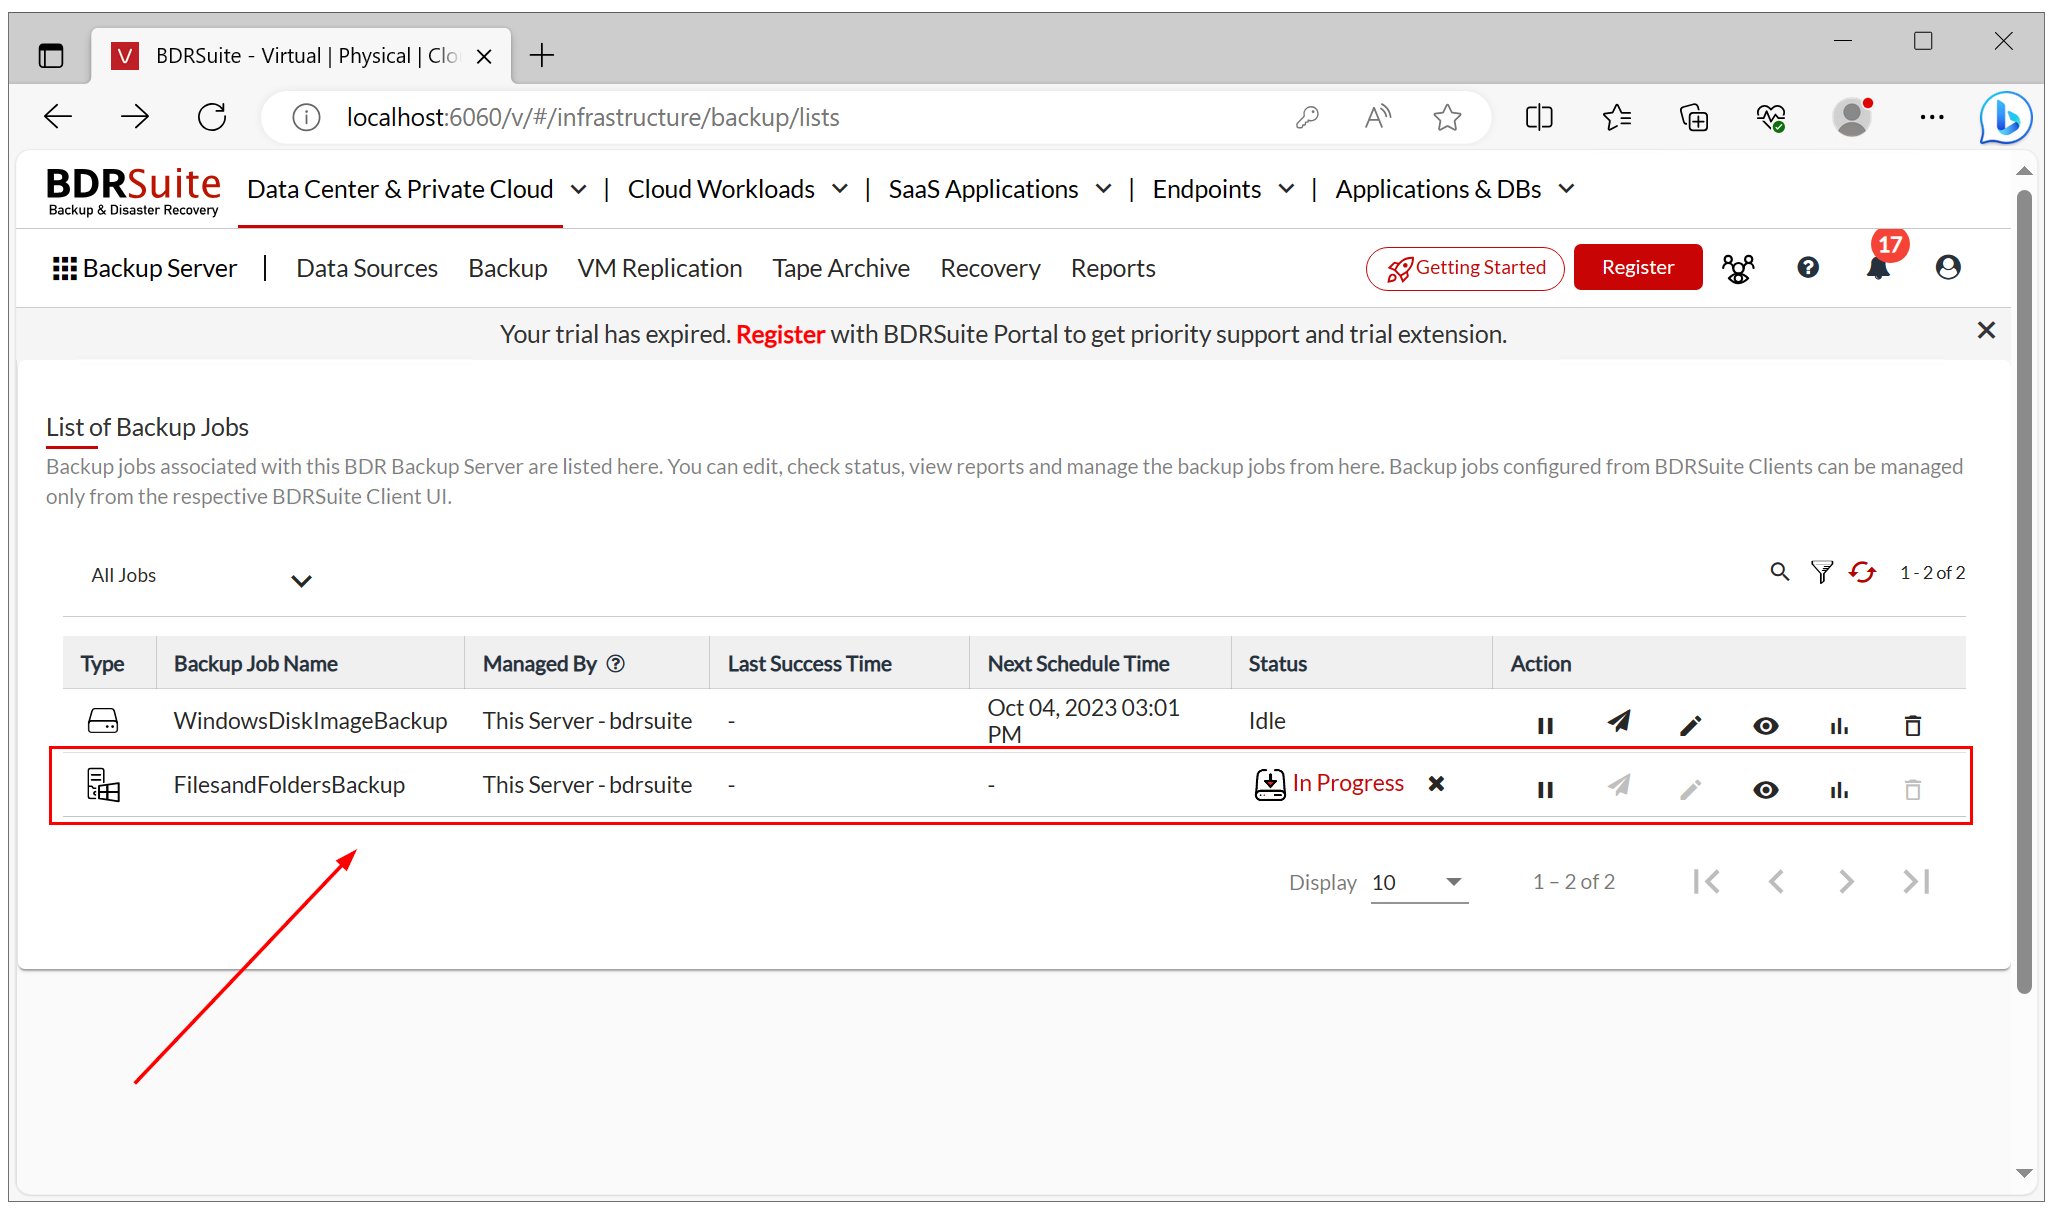
- BDRSuite will redirect you to the page with the list of available backup jobs. From there you check the status of the job, suspend or resume it.
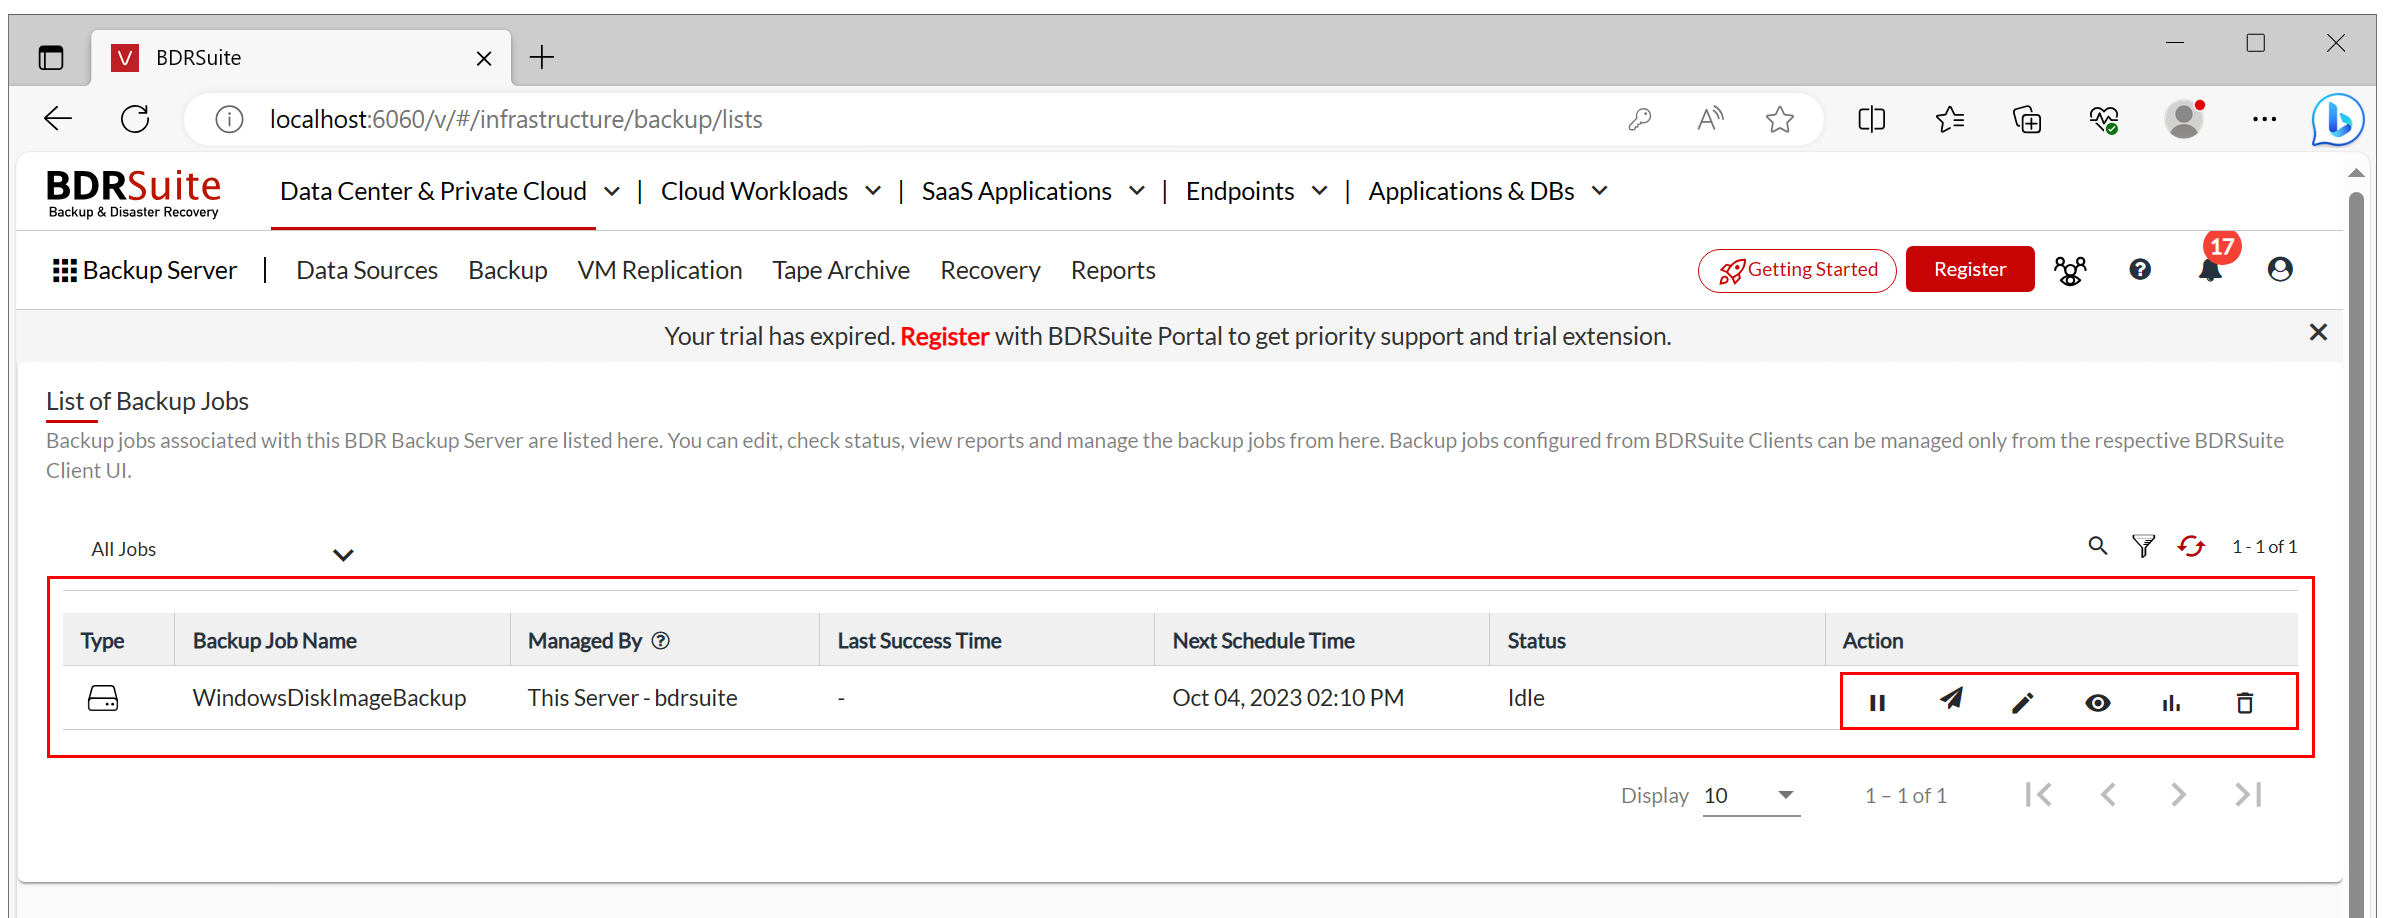
You are done. After completing this configuration, BDRSuite will automatically back up your server, and the next backup will occur based on the schedule.
File & Folders Backup
File & Folders backup helps you to backup particular files and folders from your disks.
- If you close the BDRSuite UI or sign out, open the BDRSuite web console and log in.
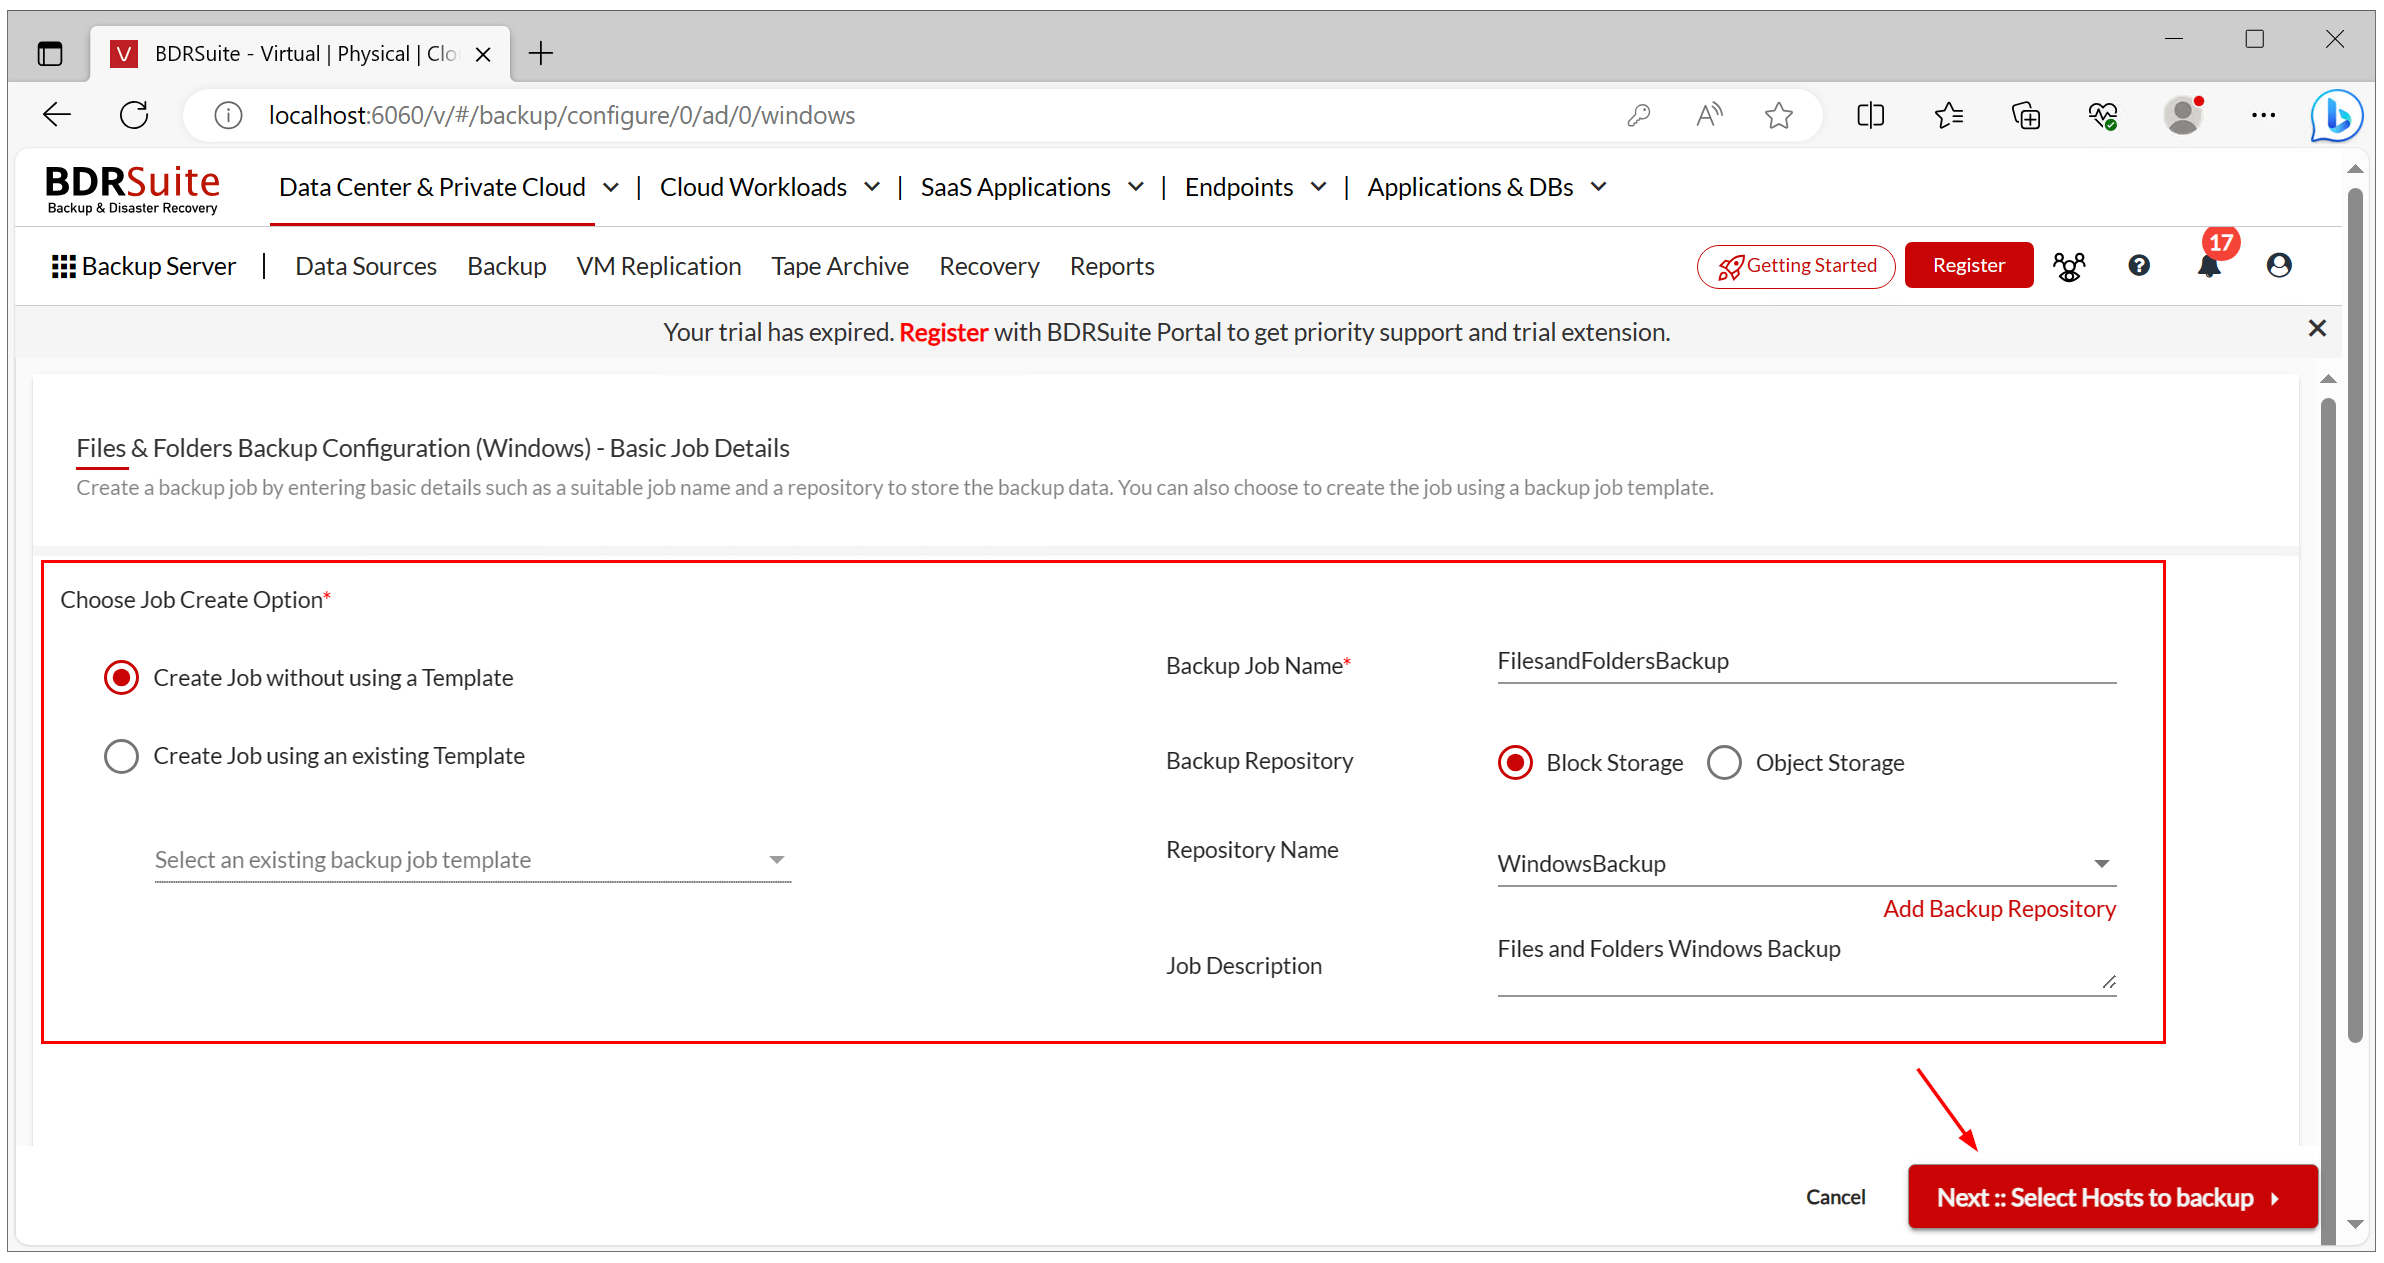
- Click on Backup > Configure Backup > Microsoft Windows, and then select Files & Folders.
- On the left side, under the Choose Job Create Option, select Create Job without using a Template.
- Enter the backup job name, select the backup repository you created in the first step of this article, and enter a job description (optional). Then, click Next::Select Hosts to backup.
- Under Select Host(s) to backup, select your machine, and then click Next::Files/Folders Selection.

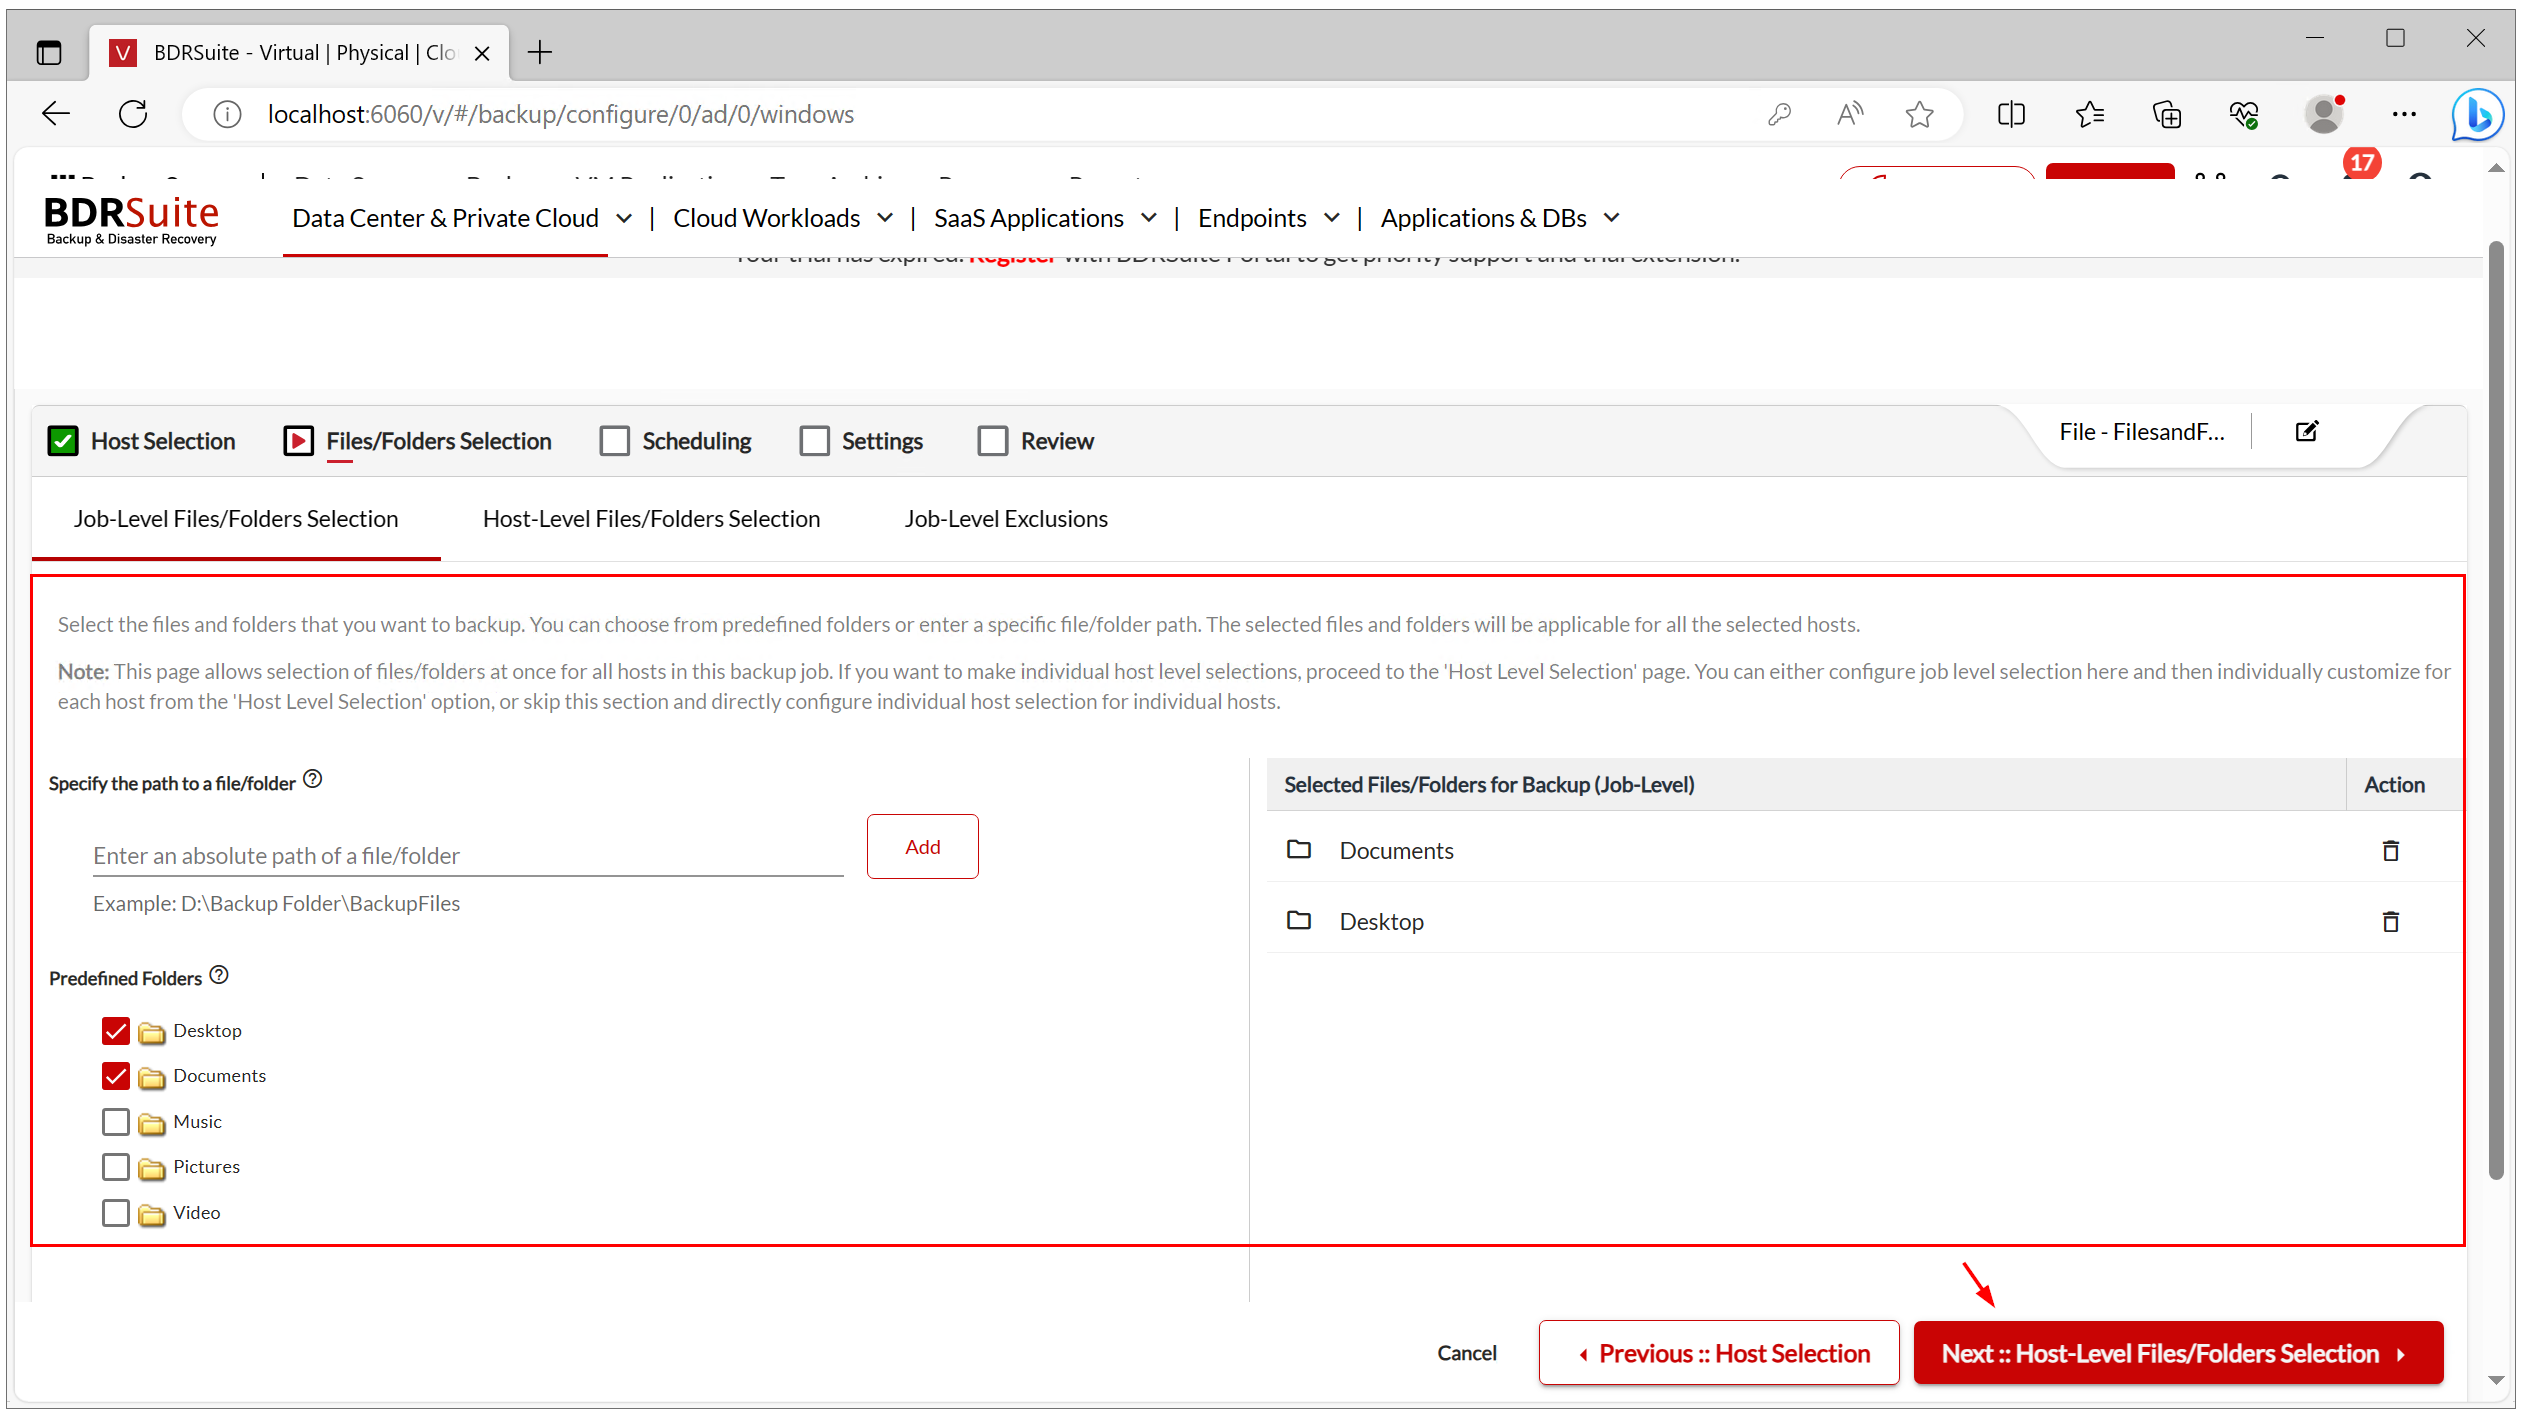
- Select the folders you want to backup and then click Next::Host-Level Files/Folders Selection.
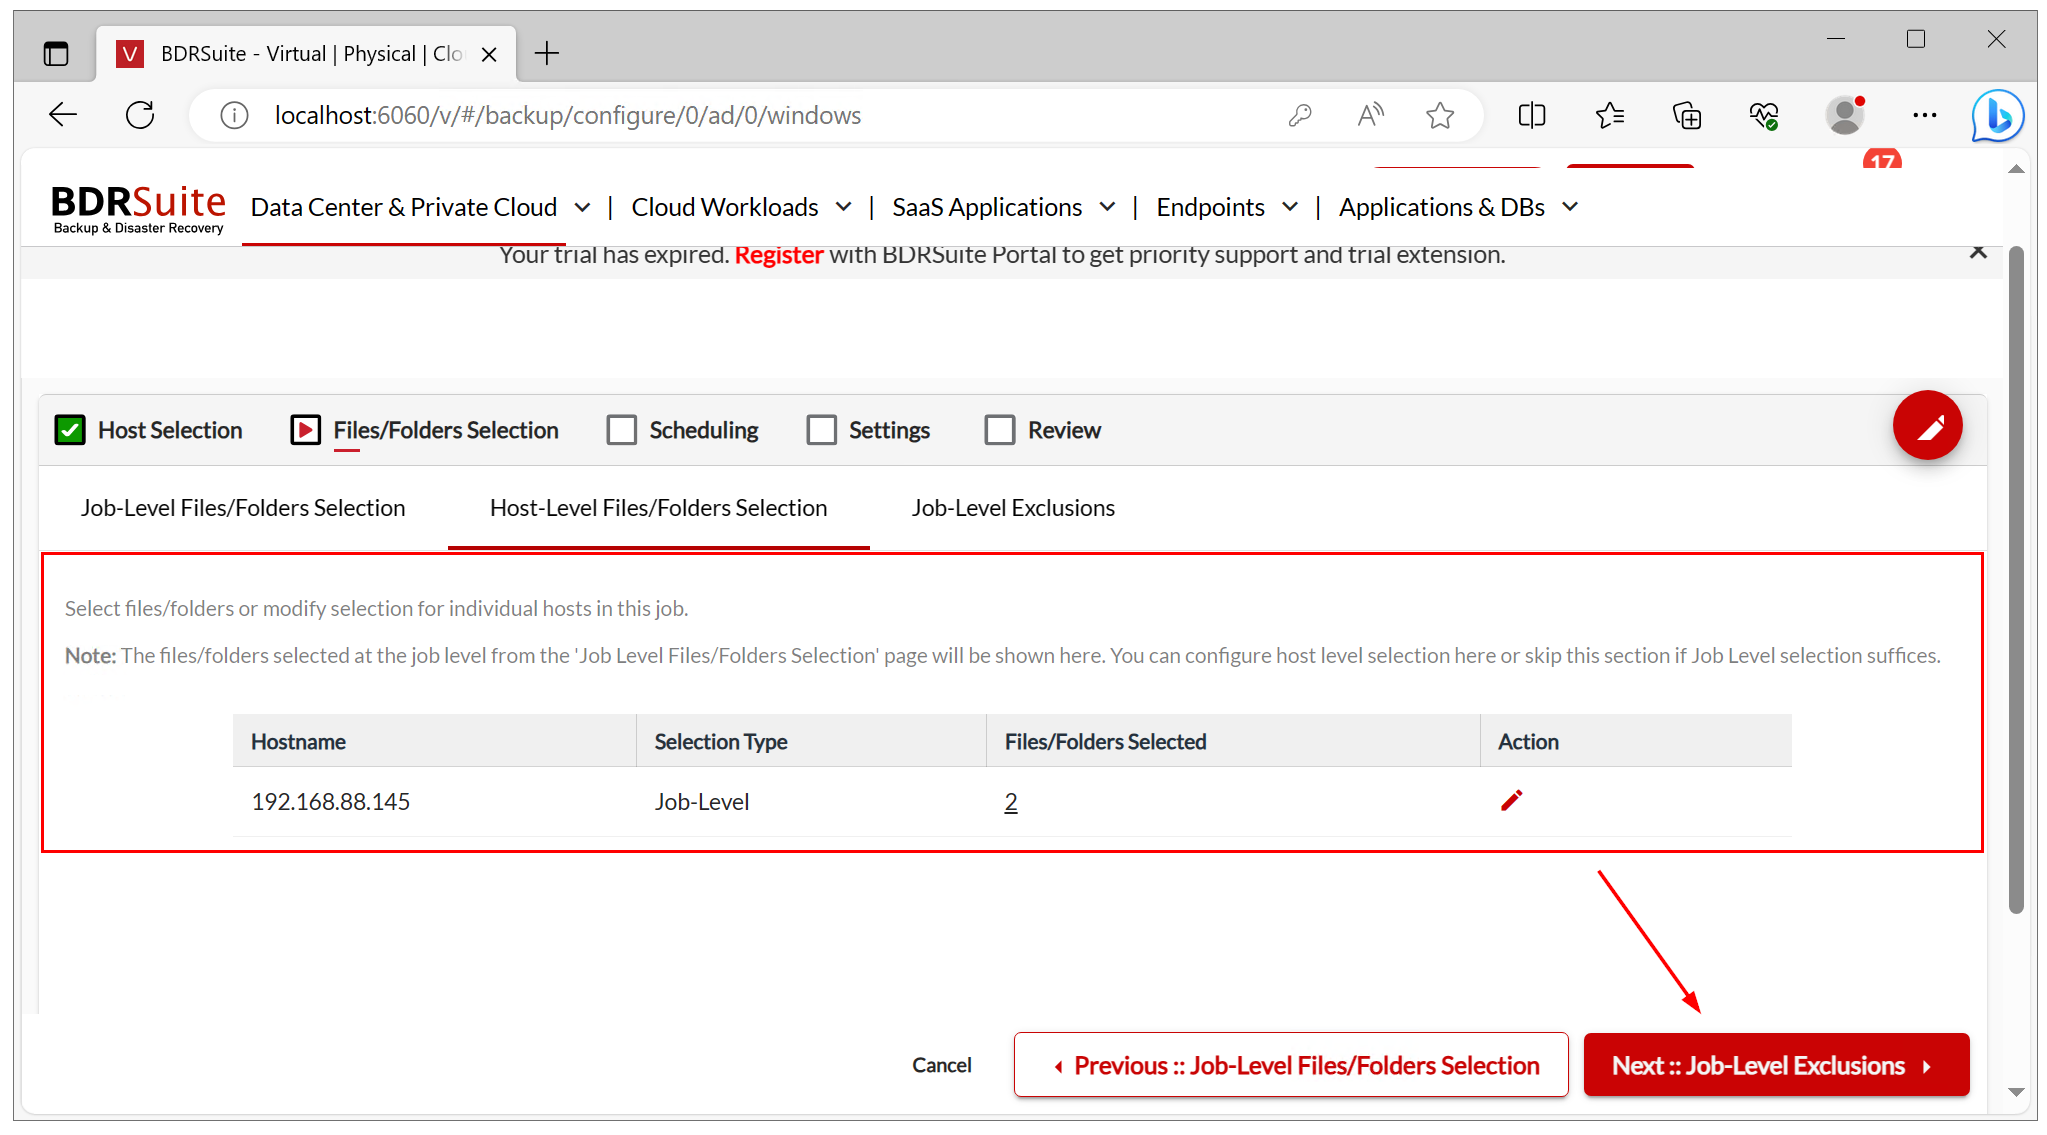
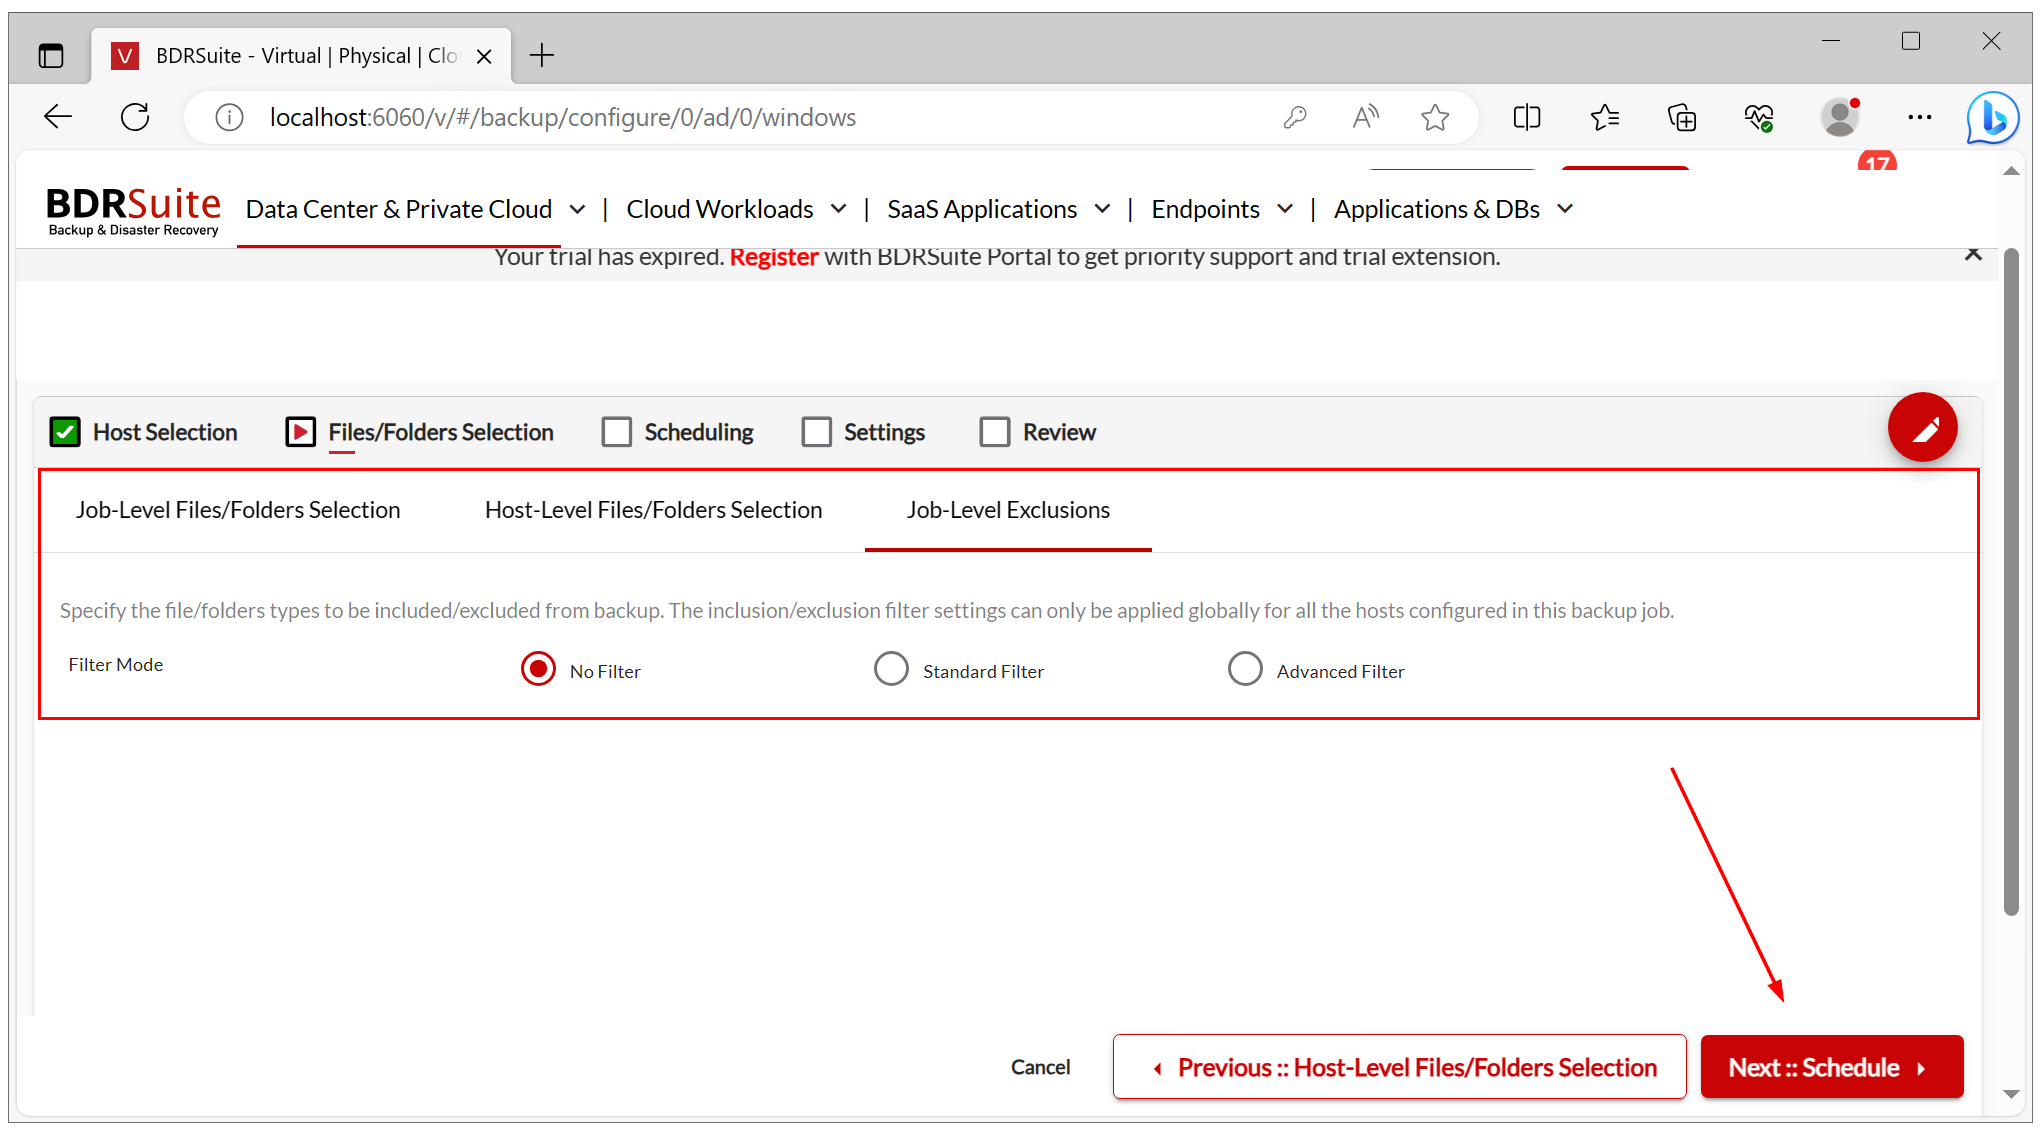
- Optionally, select files/folders or modify the selection for individual hosts in this job. Then, click Next::Job-Level Exclusion.
- Optionally, specify the file/folder types to be included/excluded from the backup. You can choose between not filtering, standard filtering to advanced filtering. Then, click Next::Schedule.
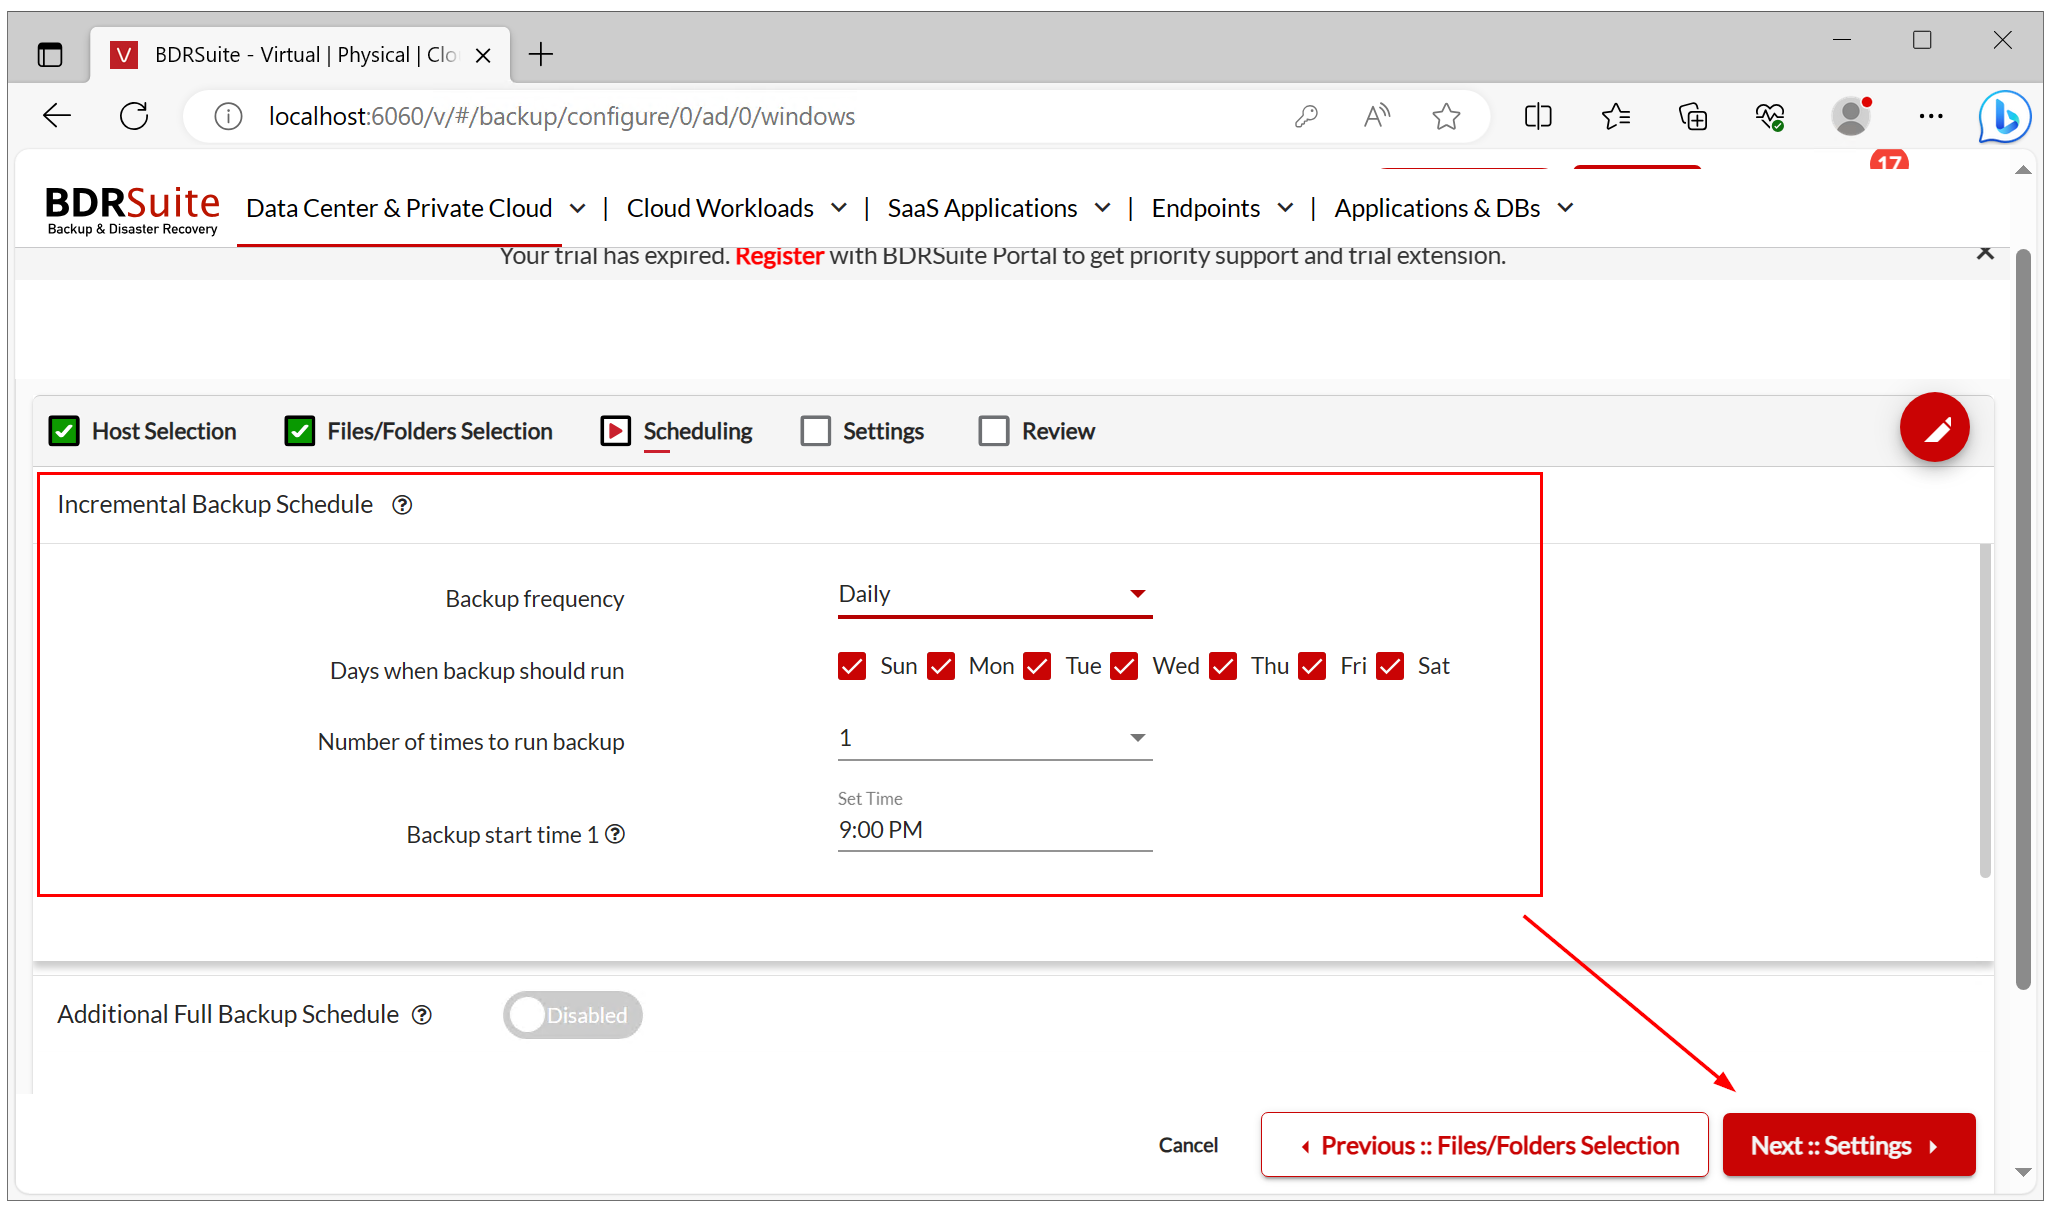
- Choose the backup frequency how often and when you want to create a backup of your Windows image. In my case, I chose daily backup at 9 p.m., which is outside of the working hours. Then, click Next::Settings.
- Configure retention for incremental backup and deleted files. This helps define how long you want to keep your backup copies.

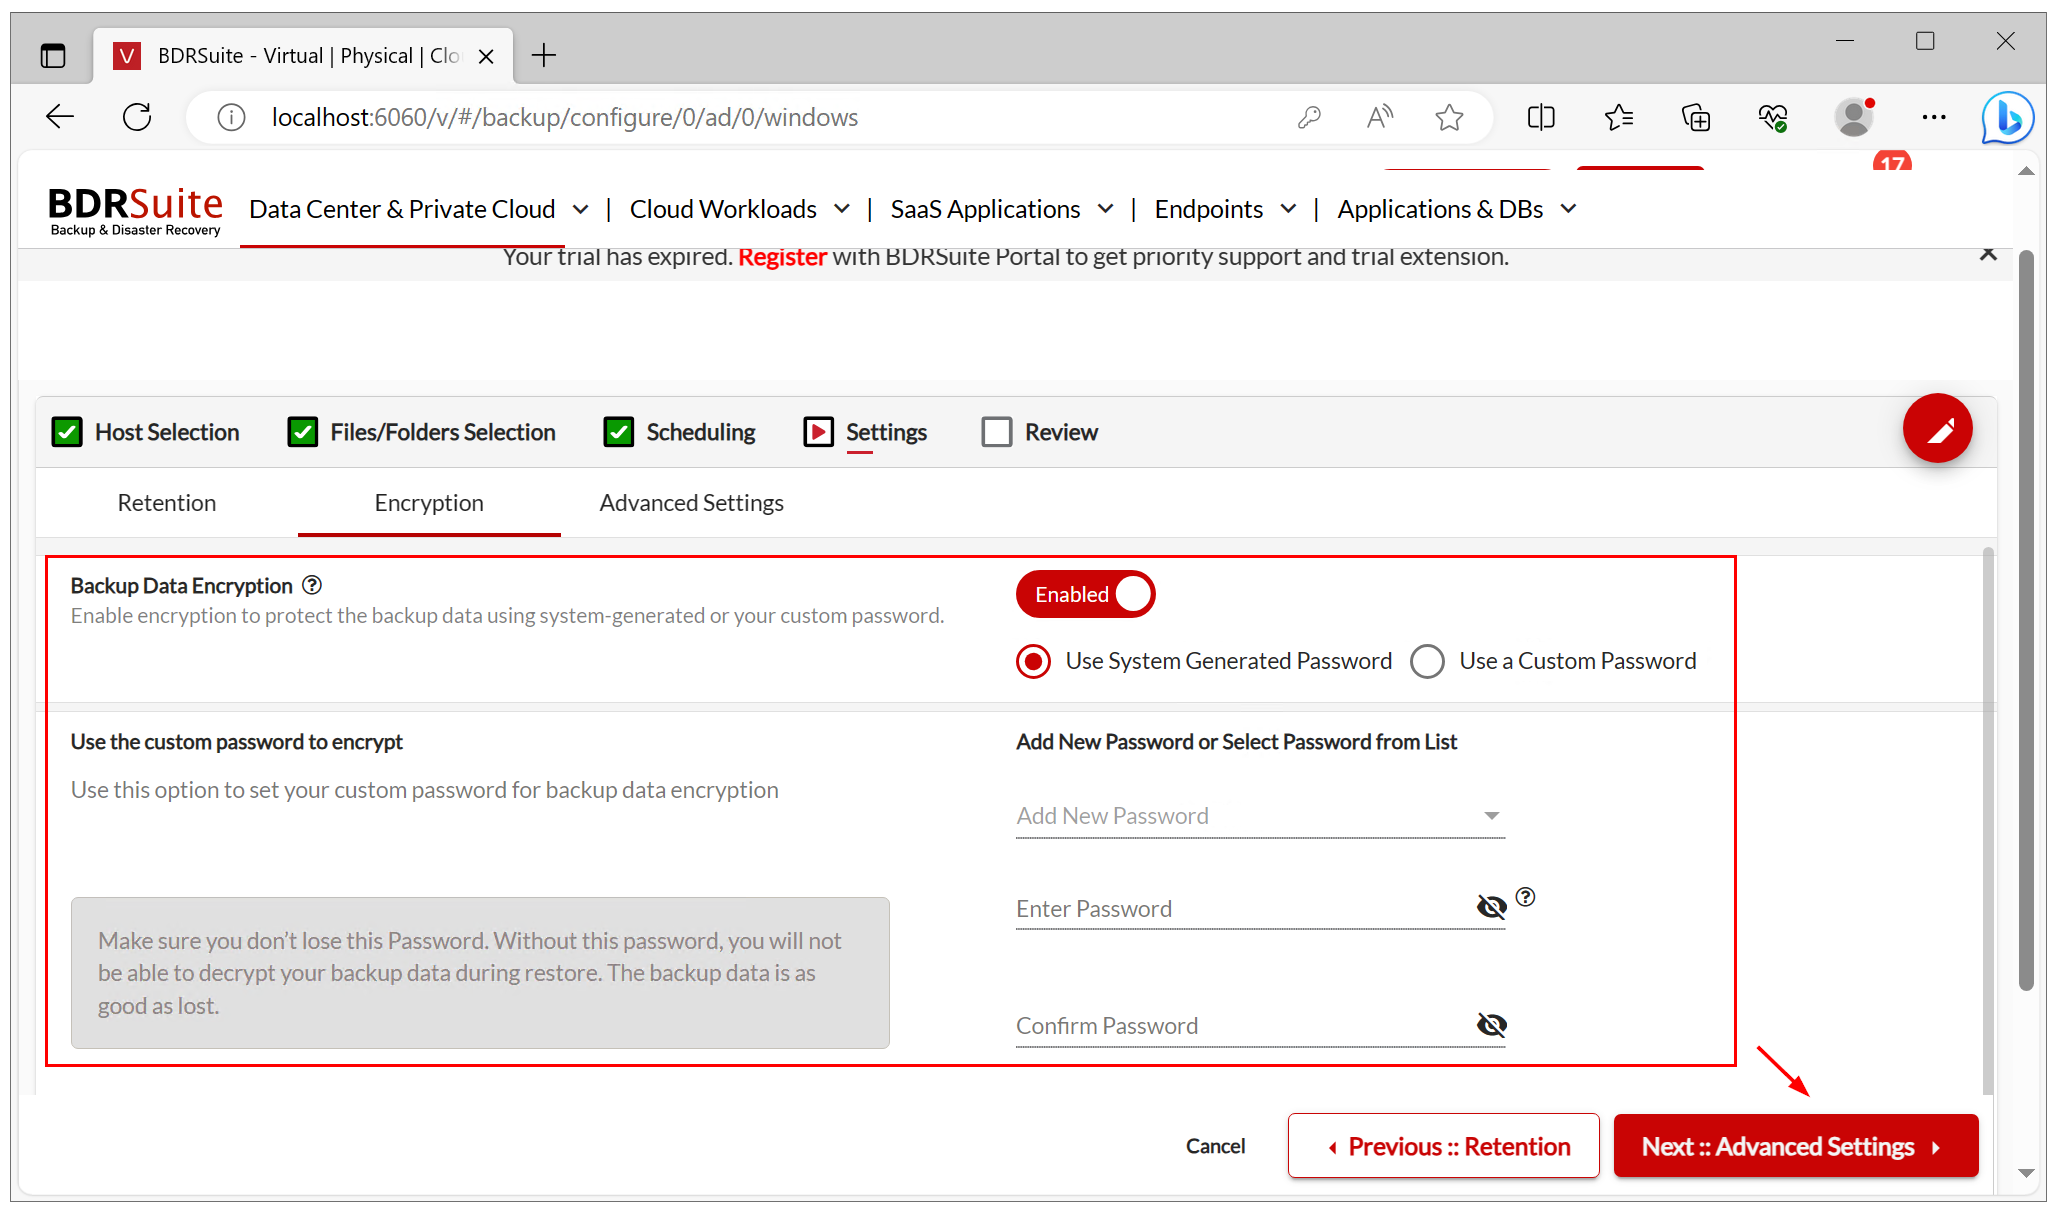
- Optionally, you can enable encryption to protect your backup copies. You can protect it using system system-generated or custom password.
If you use a custom password, make sure you don’t lose this Password. Without this password, you will not be able to decrypt your backup data during restoration. The backup data is as good as lost.
Then, click Next::Advanced Settings.
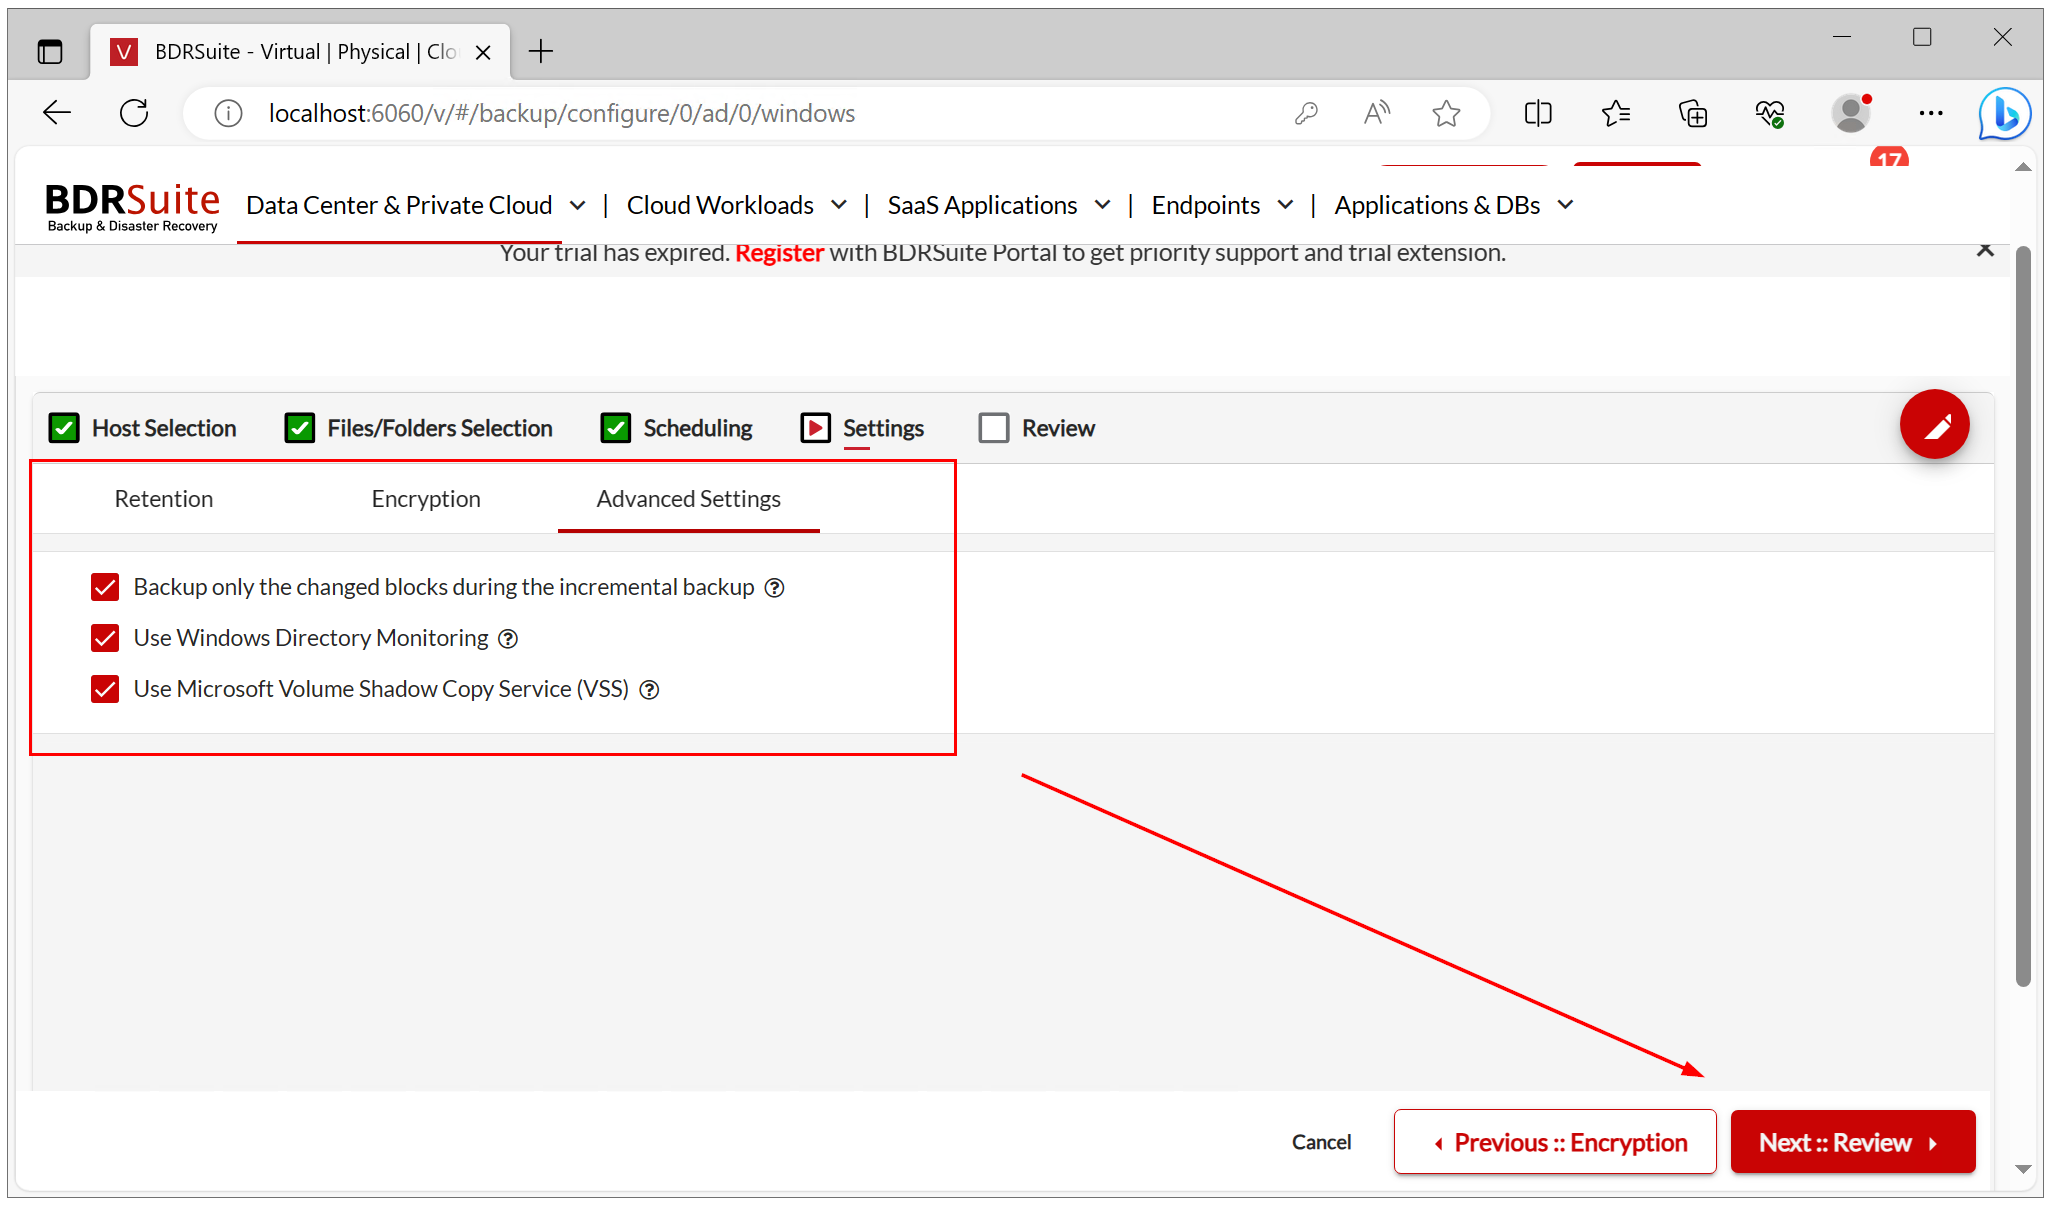
- Select or unselect the following advanced settings and then click Next::Review.
- Backup only the changed blocks during the incremental backup – if disabled, it will perform a full backup.
- Use Windows Directory Monitoring. It helps to track changes in files and folders in Windows via Windows API.
- Use Microsoft Volume Shadow Copy Service (VSS). It uses Microsft VSS to do backup.
- Review the backup configuration, select Run this backup job immediately after saving, and click Save.

- Click Save to confirm the backup configuration.
- BDRSuite will redirect you to the page with the list of available backup jobs. From there you check the status of the job, suspend or resume it.
That was quite a lengthy guide, wasn’t it?
But trust me, it needed to be because I aimed to cover every step you might encounter during the installation process.
However, I’m only human, and I might have missed something. If you have any questions or feel like I skipped over an important detail, don’t hesitate to leave your question or message in the comments.
And if you haven’t tried BDRSuite yet, here’s an exciting opportunity.
Make sure to give the trial version a whirl! It allows you to back up up to 10 machines for free, offering all the advanced features you can possibly imagine. It’s a win-win situation.
Thank you for reading.